Sunday, October 30, 2011

Criss Cross Apple Sauce

Yeah, I got sauce.

As I've mentioned, I'm on an apple binge. Who knows when the insanity will stop? I'm not sure yet, but I'll let you know. For now Applefest 11 continues in my kitchen, with no end in sight. The reason for making apple sauce was one of necessity. I had a whole crap ton (that's the scientific measurement) of apples that needed to get gone. I was in a lazy (read grumpy) mood so did not want to do anything to complicated or time consuming. I stumbled across this apple sauce recipe which looked simple and delicious; Sweet, the two things I was looking for.
Apples and Apples and Apples and Apples.
Now there are several different ways to make apple sauce, this is just one that looked appealing to me. I will as always try other recipes, given this one only lasts a few days in the fridge and I would prefer to find a recipe that lasts a few weeks. Other than that I loved the simple apple flavors and the chunky consistency. This is also an easy way to make a healthy dessert. You can also use apple sauce in recipes, I recently made a carrot cake (recipe coming soon) that uses apple sauce which was delicious. Anyway apples are freaking everywhere right now, so go get you some apples and sauce it up. 

Classic Apple Sauce
Adapted from Simply Recipes

Be sure to use good cooking apples such as Jona Gold, Mcintosh, Granny Smith, Fuji or Golden Delicious. The sugar measurements are just suggestions, use more or less depending on your preference. 
The Goods: 
3 to 4 pounds apples, peeled, cored and quartered
3 strips lemon peel-use a vegetable peeler to make strips
2 tablespoons freshly squeezed lemon juice
3 inches of cinnamon stick
1/4 cup brown sugar 
up to a 1/4 cup white sugar
1 cup of water
1/2 teaspoon salt

Serve with yogurt, ice cream, or a small drizzle of half and half. 

The Deal: 
1. Place all ingredients in a large pot. Cover and bring to a boil. Lower heat and simmer for 20-30 minutes or until apples are very soft. 
Throw everything in a pot
Simmer the crap out of it. 
2. Remove from heat and discard lemon peels and cinnamon stick.  Mash with a potato masher. Serve warm or refrigerated. This will only keep in the refrigerator in an air tight container for a few days.

You can also freeze it for up to one year, just defrost before using.

Thursday, October 27, 2011

Ginger Apple Cake

I love the red and green peels peaking through
I seem to be on an apple binge. I suppose in trying to cook seasonally I may go a little overboard sometimes. I will also admit, I'm a fruit-aholic. It's rare for me to find a fruit I don't like, and by like I mean eat in ridiculous portions. During strawberry season I believe I ate enough strawberries to be part one. So as fall approaches with its squash and root vegetables the fruit selection is fairly slim. Sure there are pears, but there aren't a ton of those around these parts. Then of course there are the incredibly non local bananas, mangos and my personal favorite pomegranates. Apples are the local fruit at the market, so I'm doing my best try as many different recipes as I can. Trying to figure out which type I like best  Jona Gold, Pink Lady, Stayman, Winesap, is a task I am happy to take on.

I love how earthy it looks. Or is that just me? 
When I saw this recipe on 101 Cookbooks, I knew I had to try it. A cake that has only half a cup of sugar, 1/4 cup of butter, whole wheat flour and no frosting? Might I even dare say a healthy cake? I do! I dare! This is about as healthy a cake you can make while still using standard ingredients. This cake really knocked my pants down (Not that hard to do given I'm such a food newbie. Or if you are healthy boyfriend....) It was moist and had a lovely apple fall flavor. The bits of apple chunks were a treat in my mouth, a juicy surprise surrounded by moist cake and subtle ginger flavor. If you are not a fan of ginger, you can just omit it, as it was not in the original recipe. Though you may want to ask yourself why you don't like ginger, what is WRONG with you?! Along with apples, I'm also on a ginger binge tossing it in any recipe I can. I think the ginger and apple pair beautifully together, but the cake will still be delicious without it. This adorable cake would be a great one to bring to a fall party, and I know kids love it too. The cinnamon and apple chunks make it sweet enough that it doesn't taste "healthy". The kids don't need to know it only has half a cup of sugar.
The recipe calls for only red apples, but I did not have enough red ones so I used one green apple. I liked the multi-colored touch, but use all the same type of apple if possible.
Ginger Apple Cake
Adapted from 101 Cookbooks

If you don't have whole wheat pastry flour, feel free to substitute all purpose flour. Make sure to leave the peels on the apples, it won't be nearly as pretty without that touch of color.
The Goods: Makes one cake
2 cups sweet crisp red apples, cut into 1/4 inch cubes (peels on)
2 1/2 cups whole wheat pastry flour
1 tablespoon baking powder
2 teaspoons cinnamon
2 teaspoons fresh ginger, grated
Dash Nutmeg (optional)
1/2 cup dark brown sugar, lump free
1/2 teaspoon fine grain salt
2 eggs
1 cup buttermilk
1/2 cup walnuts, lightly toasted* and roughly chopped (optional)
1/4 cup butter, melted and cooled a bit
3 tablespoons large grain sugar
1 lemon, juiced

The Deal:
1. Preheat oven to 400 F degrees, racks in the middle. Butter and flour one 9-inch square baking dish or tart pan. Place chopped apples in a bowl of water and lemon juice, set aside. Combine flour, baking powder, cinnamon, nutmeg, brown sugar, and salt in a large bowl. In a smaller bowl whisk together the eggs and buttermilk. Then whisk in butter and ginger. Pour the buttermilk mixture over the flour mixture and stir until barely combined-careful not to over mix. Drain the apples, then fold apples and half of the walnuts into the cake batter.
Making your batter
Folding in your drained apples and nuts
2. Spoon batter into the prepared pan, pushing it out toward the edges. Sprinkle with most of the large sugar and the remaining nuts. Bake for about 20-25 minutes or until the cake is just set and a touch golden on top. Serve warm or at room temperature.
Ready for the oven
*To toast walnuts, place in a skillet on medium heat. Heat until VERY lightly browned, about 5-10 minutes. They should smell toasted. Watch carefully, it's very easy to burn your nuts. (Insert nut joke of your choice here)

Wednesday, October 26, 2011

Fresh Vegetable Sauce with Pasta


This is a really quick way to eat your vegetables and have dinner on the table in under 20 minutes. This dish appealed to the lazy daisy inside me, who doesn't always want to spend an hour or two cooking on a weeknight. Sometimes I need something quick, that is also nutritious, and of course yummy. Especially when cooking for healthy boyfriend, he is not a fan of the ole bread and cheese dinner I used to be so fond of. It's good to keep him around because he is constantly making sure there is enough healthy food on the dinner plate.
This sauce is easy, and most of the vegetables are in season right now. Not sure about the rest of the country but in NC you can still buy tomatoes, eggplant, onions, and garlic at the farmers market.
The combination of these vegetables was lovely, which makes sense given they all grow around the same time. Food that grows to together, stays together. Or should anyway.
Only a few chops and 15 minutes stands between you and a healthy dinner!

Pasta with Fresh Vegetable Sauce
Adapted from Jacques Pepin's Table

Be sure to boil the pasta-cooking water before you begin the vegetable sauce. It only takes about 7 minutes to make the sauce and 8 minutes to cook the pasta, so have your water boiling before you begin.
The Goods: Serves 4
1/2 pound spaghetti (number 4)
1/4 cup virgin olive oil
1 large red onion (1 1/2 cups), halved and thinly sliced
1 small eggplant (6 ounces), diced into 1/2-inch pieces
3-4 cloves garlic, minced or crushed
2 ripe tomatoes (12 ounces), seeded and cut into 1/2-inch pieces
1 teaspoon salt
1/2 teaspoon freshly ground pepper
2 tablespoons parsely, coarsely chopped
2-3 tablespoons freshly grated parmesan cheese

The Deal: 
1. Bring water to a boil. Add pasta, return water to a boil, and cook for about 8 minutes, until pasta is just tender to bite.

2. Meanwhile heat the oil in a large saucepan and saute the onions and eggplant until soft and browned, 6 to 7 minutes. Remove the pan from heat and mix in the garlic. Add tomatoes, salt, and pepper. Mix throughly and set aside.
Accidently diced my onion, but just slice thin into strips

3. Remove 1/3 cup of the pasta cooking water, and add it to the eggplant mixture. Drain the pasta, add it to the saucepan, and toss to coat it with the vegetables. Serve immediately, and sprinkle with parsley and parmesan to taste. 

Sunday, October 23, 2011

Carrot Pie? Carrot Tart? Delicious? Yes!

Red carrots on the outside, orange on the inside. 
I mean how could I NOT buy these? 
I would cook this dish for the smells alone. Have you ever boiled carrots in orange juice and ginger? If they made a perfume that smelled like that, I would buy it. Not sure where I would wear it, and for that matter I don't wear perfume to begin with....Point is making this dish was a treat for my nose. My mouth as well, but my kitchen smelled like heaven. I love dishes that smell so intoxicating you can't help but but drool while preparing them.
Come on, you know that is pretty cute. 
This pie, which kinda looks like a tart, was made on a day I really needed comfort. Something simple, beautiful, and different. I'm not quite sure how to describe it, part pie, part tart, part carrot cheesy goodness, all parts DEEEElicious. I would love to try this recipe with other vegetables, given how simple it was. Sure it took some time, but you can make the filling or the whole pie a few days in advance. You can also make the crust in advance which will cut your kitchen time in half.

The sweetness of the the cinnamon paired beautifully with the spicy ginger and the ricotta cheese gave the whole dish a lovely texture. Parmesan with is salty nutty flavor could pretty much get put on a kitchen counter and I would eat it. And have, right off the counter.
The crust was nice and crunchy on the outside while still being chewy on the inside. It was sturdy enough for this hearty cheese carrot filling. There is a similar recipe with mushrooms, which I will have to try when I like mushrooms more. As for now, I love me some carrots. This dish was perfect for a fall evening.

The carrots were from the local market, carrots are still in season so try to buy local organic ones if you can. You may notice from the pictures, I also used some butternut squash, because I did not have enough carrots, so I threw in a mini squash. I would like to try this dish with only squash sometime soon. Though I should probably have a few nights devoted to green vegetables or big salads before I make another pie. Pie Sigh.

This is a great dish for a party, cute and different while still being easy and cheap. So come on, this is the kind of bunny food anyone will love. 

Savory Carrot Pie
Adapted from Almost Vegetarian

The filling can be made up to two days in advance, tightly covered and refrigerated. The whole pie can be refrigerated tightly wrapped for up to three days. If you don't have Majoram, you can use thyme, oregeno or basil as a substitute. 


The Goods:
1 recipe Savory Pie Dough
3/4 pound carrots, peeled and sliced
2 bay leaves
2 teaspoons fresh ginger, grated
1 cup fresh orange juice
2 cups water (or to cover)
1/2 teaspoon ground cinnamon
Pinch ground nutmeg
Pinch dry majoram, crumbled
1 large egg, lightly beaten
1 cup part-skim ricotta cheese
1/2 cup grated parmesan cheese

The Deal: 
1. Prepare the dough for the Savory Pie. In a large saucepan, combine the carrots, bay leaves, ginger, orange juice, and water to cover. Bring to a boil over medium-high heat, cover and turn heat down to medium and simmer until the carrots are mushy, about 20 minutes. Preheat oven to 400 degrees.
Boiling your carrots. Caution. Will smell crazy delicious.
2. Pick out bay leaves. Using a slotted spoon, transfer carrots to the work bowl of a food processor. Puree in pulses, being careful the mixture doesn't become watery. Add cinnamon, nutmeg, and majoram and process briefly until smooth. Transfer to a bowl and stir in egg, ricotta cheese and parmesan cheese until combined.
Stirring your egg, ricotta, and parmesan
3. Roll out your dough on a 12 inch square of parchment into a round 10 inches in diameter. Pile the carrot filling in the center and spread it leaving a 2 inch margin all around. Bring the dough up on all sides as if you are going to encase the filling, but leave a 6 inch "window" in the center. Crimp dough around the sides to hold it in place.
All ready to bake.
4. Transfer to a baking sheet or preheated pizza stone, and bake until crust is a deep golden and the filling is set. If the crust browns before the filling sets, cover with foil, lower the heat to 300 degrees and bake about 10 minutes more. Serve hot.

Friday, October 21, 2011

Feelin Savory? I've got the dough for you.

The catharsis of dough. Sometimes I need to hear a voice, read a book, or spend some time with a tree and a good breeze to feel calm. But more and more I find peace in the kitchen, regardless of the outcome; the process of creating a dish pauses my brain from worry and helps me focus on the task at hand.
Yesterday was not a terrible day, it was just kinda sucky. Like an entire day of tripping over your shoelaces, a series of "Son of a BITCH!"type moments, but nothing life altering. The day began with the discovery I was out of coffee and was followed quickly by a trip to the dentist. There isn't enough space on the internet for me to relay the ongoing struggle I have with the dentist. I'm an annoyingly obsessive flosser and brusher, eat moderately healthy (fairly good about the sugar intake), yet every time I go to the (insert expletive here) dentist, I have a cavity. Being without dental insurance, I know that a cavity is really 150 dollars I will now have to put on my credit card and pay down as I can. Oh, right, I had two. 300 bucks gone and a mouth that made eating anything but yogurt unpleasant. The rest of the day was a series of blah events, and even though my mouth hurt and my tooth was playing 'how much can I ache" all I wanted to do was cook. Not that I could eat much, but that's what leftovers are for, yes?

I've been curious about this crust since I read it, given there is no oil or butter, and it uses sour cream. Really I just love making dough. Making a pie crust or pizza dough is so relaxing. Watching it rise feels like magic, then rolling it out, the slow steady process of trying to make a round shape, failing, trying again and getting it just right. The feel of the powdery flour on your hands, and the beautiful accidental designs made in the flour as you roll out your dough. If you have never made your own crust, you are seriously missing out.

This dough was used for a carrot pie/tart/thing I'm not sure what to call yet. I'll post that recipe within the next day or two, but I believe this is a great all around crust. Use it for pizza, savory tarts, or whatever you need a sturdy dough for. The flavor was hearty, the dough was chewy yet still had a nice crunch, I must say I was really impressed with this dough. I plan on spending many more days rolling out this dough while letting the worries of my life take a backseat to the moment I'm living.


Savory Pie Dough
Adapted from "Almost Vegetarian"


If you don't have wheat pastry flour, just use all purpose flour. 


The Goods: Makes on 10-12 inch pie
1 teaspoon dry active yeast
1/3 cup tepid water (lukewarm)
1/2 teaspoon dry malt or sugar
3/4 cup all purpose flour
3/4 cup wheat pastry flour
1 teaspoon salt
1 large egg, lightly beaten
3 tablespoons nonfat sour cream

The Deal: 
1. In a small mixing bowl, stir together the yeast and water. Let sit until frothy about 10 minutes.

2. In a large bowl, combine the dry malt or sugar, all-purpose and pastry flours and salt. Make a well in the center, and add egg, sour cream and yeast mixture. Stir to make a soft dough. Turn out onto a lightly floured surface and knead briefly until smooth.

3. Clean the larger bowl, and return the dough to it. Cover with plastic wrap or a light towel and place in a warm spot until doubled, about 45 minutes. Use as directed in recipe
At this point you can refrigerate the dough, tightly wrapped in plastic, for up to 3 days. Bring to room temperature before using, also allowing it to rise.

Wednesday, October 19, 2011

Pesticides both blow and suck


Pesticides. The word sounds like a evil character in a children's story. Evil Doctor Pesticide was determined to poison the little children of adorableville. Muahahaha. ha. Unfortunately many people do not know enough information about what they put in their bodies, and all the dangers that are present in government approved food. 

I wanted to post some information sites separately because beyond recipes and funny stories, my goal for this blog is to educate myself about food. Then use that knowledge to encourage others to make conscious food choices. Pesticides are a pretty nasty buisness, and many do not realize how damaging they can be, especially to young children.

There are a million sites out there that have loads of information about specific pesticides, their effects, and what you can do to avoid them. For a good go to site with tons of information check out What's on My Food? This site has information about specific pesticides, foods and how they are affected, and work being done to eliminate pesticides. 

Another great one is: Clean 15, Dirty 12 Take some time to explore this sight, it's got great bullet point information about pesticides. It also has the oh so handy list of the "Dirty Dozen and the Clean 15" The dirty dozen are the fruits and vegetables that are most important to buy organic because they absorb pesticides very easily, and pesticides don't necessarily wash off with a quick rinse. The Clean 15 are the opposite, fruits and vegis that have little to no pesticide absorption and are less important to buy organic. You can print out a list and keep it in your purse or wallet (like me!) so you can refer to it when shopping.  

The last sight I'll list is one that has information on food, but also larger environmental issues, such as facts on energy, water safety, and bills that are trying to make it through congress. If you are interested in food but also the environment as a whole, this is a fantastic site: Environmental Working Group.

If you have time, I urge you to check out these sites and learn more about food. I will make an effort to post more articles and current information about food, because knowing ABOUT your food is as, if not more important, then knowing how to cook it. 

Information is power yall, so Power up! 

Tuesday, October 18, 2011

Being Lazy with Curry

It's ALIVE, IT'S ALIVE!
Recently one of healthy boyfriend's roommates made a thai meal for a bunch of hungry 20 somethings on Friday night. Healthy boyfriend called to inform me that I did not have to make dinner and I was sold.
His roommate had spent a while in Thailand and was making various Thai curries, jasmine rice, and curried potatoes. I'm pretty much in kindergarden when it comes to asian cooking and asian flavor. I love the spices and flavors, but haven't had much time to dabble in the kitchen with asian cuisine. I make a mean peanut butter sauce and that's about it.

Dinner ended up being delicious and I was so impressed with curry. Not too spicy with hints of ginger, garlic, and lemon grass. Healthy Boyfriend's roomie confessed he could not take credit for any of the flavor. He bought pre-made curry pastes from the local asian store and just let it simmer for a few hours. That night I made sure to write down the curry paste he had used and the rough "recipe" which was mostly throw everything into a pot and let it simmer.

This is one of the easiest dishes ever. Of course there is some cheating involved when it comes to developing flavor. But sometimes I need an easy go to dish, that takes little kitchen time, and has a flexible ingredient list. All the vegetables were carefully selected by looking in my kitchen and seeing what I had around. One of the best things about making curry, is it's forgiving with ingredients. You can use almost any vegetable because everything tastes good in a curry. All the vegetables were local which is always nice, since the paste and coconut milk were both imported from Thailand.

So if you are looking for an unbelievably easy soup that you can throw almost anything in, here you go.
This is what the curry paste I bought looked like, but there are many different companies that make this type of paste. Depending on where you live, you may need to visit a speciality Asian market to find these types of pastes. Masaman is a mild sweeter curry, but there are spicier ones, green extremely mild ones, and everything in between.
Once I know more about these flavors I would love to develop the flavors myself, and make curry from scratch. With colder weather creeping into our doorways, I do think we all need a few quick soups that take almost no effort and produce outstanding results.

Masaman Curry with assorted Vegetables

The Goods: Serves 4-6
1 (4 oz) can of masaman curry paste
2 (14 oz) cans unsweetened coconut milk ( I used one regular and one light)
2 tablespoons peanut oil
2 cups brocolli, chopped
2 cups carrots, chopped
4-5 radishes, sliced into 1/2 discs
3-4 small potatoes, peeled and chopped
1-2 medium sweet potatoes, peeled and chopped
1 large onion, chopped
1 tablespoon fresh ginger, grated

The Deal: 
1. Heat peanut oil in large pot on medium heat and stir in paste. Heat until combined about 3-4 minutes. Stir in 1 can of coconut milk and heat for 5 minutes. Add all your vegetables, the other can of coconut milk, and ginger. Bring to a boil, then reduce heat to a simmer. Simmer on low heat until all the vegetables are tender, about 40 minutes. Serve hot.
Paste and Oil
From a bunch of ingredients to curry!
You can simmer up to 4 hours, though you may need to add additional coconut milk or vegetable broth. Serve with jasmine rice or another starch. 

Sunday, October 16, 2011

Who is my little pumpkin' bread?

Pumkin, chocolate, and raisins. Oh yum! 

It's time for pumpkin bread. As nights get colder we require our treats to warm our bodies and our spirirts. The oranges, reds, and yellows of fall engulf our vision every time we step outside. Our closets are changing from breezy dresses and tank tops, to bulky sweaters and heavy boots. We can smell winter coming, yet still have "sweater weather" to look forward to.

I love fall. I love the smells, the colors, the holidays, even the term. Fall. Things falling all around us, summer falling behind to make room for winter. Life always seems to change for me in the fall. Perhaps the cold air triggers a nerve in me that lays dormant and sleepy during the relentless heat of summer. Fall is often the time for reflection, summer makes us lazy, winter freezes our bones, fall is the time to ponder.
Of course I miss the abundance of local produce that's available in the summer, but fall still has a lot to offer. Funny shaped winter squash, earth toned root vegetables, and green beans as far as the eye can see. 

Perfect time for bread. Pumpkin, squash, banana, any kind of bread you like. Pumpkin bread is incredibly easy, especially if you buy pre-made pumpkin puree. Soon I'll get a "pie pumpkin" and make my own pumpkin puree, but for now the organic store bought kind works great. Be sure you buy just pumpkin and not "pumpkin pie" filling. This already has spices and it's own flavoring. 

The original recipe, which came from Orangette, called for hazelnuts, but those can be hard to find and expensive when you do. I used some dark chocolate because I wanted this to be more of a dessert bread. You could also use walnuts or pecans and omit the chocolate, though chocolate and pumpkin are so good they are bad. 

If you have never made your own pumpkin bread, then now is your time. It's so easy, and besides having to wait while it cooks, it takes very little in the kitchen time. Do make sure your eggs and butter are at room temperature, because that effects how all the ingredients mix together.

For an extra fancy twist, serve this toasted and sprinkle a little powdered sugar on top.

Pumpkin Bread with Golden Raisins and Dark Chocolate
Based on Orangette recipe


The Goods: Makes one loaf
1 1/2 cups unbleached all-purpose flour
1 1/2 tsp ground cinnamon
1 tsp baking soda
1 tsp salt 
1 tsp ground ginger
1/2 tsp ground nutmeg
1/4 tsp ground cloves
1/4 tsp baking powder
1/3 cup water
1/2 tsp pure vanilla extract
6 Tbs unsalted butter, at room temperature
1 1/3 cups sugar
2 large eggs, at room temperature
1 cup pumpkin puree, at room temperature
1/2 cup, dark chocolate discs or chips
1/3 cup golden raisins

The Deal: 
1. Preheat oven to 350 degrees. Grease a 9- by 5- loaf pan. 

Get your bread station ready
2. Whisk together flour, cinnamon, baking soda, salt, ginger, nutmeg, cloves, and baking powder until throughly blended. In another bowl, mix water and vanilla extract. In a large bowl, beat butter until creamy, about 30 seconds. Gradually add sugar, and beat on medium speed until lightened in color and texture, about 3 minutes. Beat in eggs one at a time. Add pumpkin puree, and beat on low speed until just blended. Add flour mixture in three parts, alternating with the water-vanilla mixture in two parts, beating on low until just smooth and combined. Scrape down the sides of the bowl with a rubber spatula as necessary. Fold in raisins and chocolate. Pour into bread pan and spread evenly across the top.
Cream butter and sugar
Halloween spatula helps make you feel spooky :)
Adding your special treats
Only an hour away from delicious
3. Bake for about 1 hour, or until a toothpick inserted comes out clean. Let cool in the pan on a rack for 5-10 minutes before unmolding and cooling completely.

Serve warm, toasted with butter or at room temperature. This will keep in a ziplock for a few days.

Thursday, October 13, 2011

Eat more green beans

Crispy, juicy vitamin A, C, and K rich green beans. You may wonder how many ways a person can cook green beans. Well, if you are me, a WHOLE freakin lot. I plan to eat my weight in green beans until they are out of season. Join me, wont you?

You can use onions in a pinch, but shallots have a more mellow flavor. I used water which is fine but  the broth will add more flavor to the beans. Personally I prefer to just taste the bean, and not broth, so I stick to water. If you make your own broth or are trying to entice picky eaters to consume their greens, broth is a nice touch.

Toasted Sesame Seeds make everything better. I believe if I were to sprinkle them on a bitchy person, their personality would instantly improve. Though that is probably not the case, given the reality in my head and actual reality often disagree.

Regardless, make these beans. They look great, are wicked easy and will go with almost everything.


Sesame Green Beans


The Goods:
1 pound green beans, ends trimmed
2 tablespoons olive oil
2 tablespoons sesame seeds
2-3 shallots, minced
3/4 cup vegetable broth (or water)
Salt and Pepper

The Deal: 
1. Toast sesame seeds in a skillet on medium heat until golden brown, 2-4 minutes. Watch closely, they burn easily. Set sesame seeds aside.

2. In a large skillet heat oil on medium heat until shimmering. Add shallots and cook until golden, about 5 minutes. Add beans and broth. Cover, reduce heat to low and simmer, stirring occasionally until the beans are tender and bright green. This will take about 15-20 minutes. Remove from heat and toss with toasted sesame seeds. Season with salt and pepper if desired. Serve immediately.

Wednesday, October 12, 2011

I like to quiche and tell

Quiches and Hugs. I must be stopped. 
"Baby, put the books up, it's time for sleeping," Healthy boyfriend yawns as he begins to close the mini fortress of cookbooks I have stacked around me in bed.
"I gotta figure out something to do with this eggplant and chard. Five more minutes, promise."
 After another 20 minutes he forces me to put the books away and lay down. Our bodies mold to each other and I attempt to shut my brain down, beginning my calming yoga breathes.
 "Quiche! Why don't you make me a quiche!" He whisper shouts, poking me in the sides with his excited fingers.
"Those are kinda time consuming babe, I would have to-"
"Yes! Great! A quiche it is. Thanks baby." He smiles and hugs me close, knowing I'll be dreaming of quiche all night.

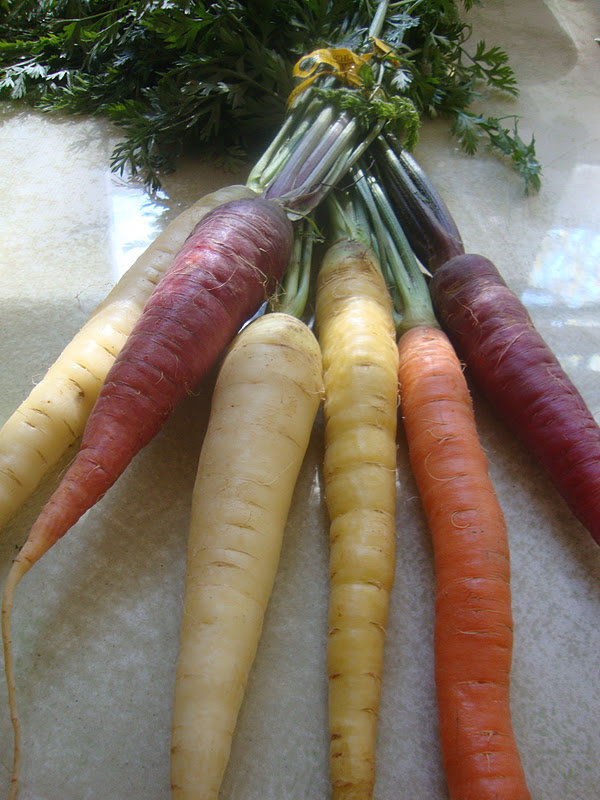
And how did this quiche turn out you wonder? Really fucking good is how. Possibly one of the best things I've made so far for my blog. I have made a few quiches in my day, but never one this tasty. There are a few tips that, if followed correctly, ensure a creamy center and crispy flakey crust every time. The ingredients I used were all local vegetables I needed to cook before they spoiled, and I think they worked beautifully together. Even though plain saute chard really bothered my taste buds, I loved it in the quiche. Cream and goat cheese helps plenty of things go down easier. I used fairy tale eggplant, because that's what I had, but traditional or japanese would work as well.
Don't they look right out of a fairy tale? They have hats! 
Does making your own crust take a while? Yes. Does everyone have that kind of time? No. Does a light, flakey homemade crust set your quiche apart and encourage you and your dining companions to high five each other in a victory that can only be described as a Quiche-ictory? Hell yes! Make your own crust, your life will be better for it.

If you are making your own crust, then you have plenty of time to carmelize the onions. I started cooking the onions about 15 minutes after I put the crust in the freezer. That way they were done before I had to cook all the other vegetables. If you buy a pre-baked crust you can always just saute the onions until lightly browned, which takes about 5 minutes. The caramelized onions were succulent, sweet and added a real pop to the quiche, so I highly encourage the additional effort. Earthy garlicky chard, sweet onions, salty eggplant, finished with creamy goat cheese. What more could a quiche ask for?

I debated whether you really need heavy cream AND whole milk. That is what I used because I happened to have both on hand. Healthy boyfriend drinks whole milk (still not a ounce of fat on his beautiful body) so he always has some handy. Next time I will try 1/2 and 1/2 and perhaps 2% milk.


All the vegetables and eggs were local. The thyme was from my tiny herb garden. Fall has incredible vegetables to offer, so go explore your local farmer's market. It's likely you can find all these vegetables. You don't have to quiche and tell if you don't want to :)


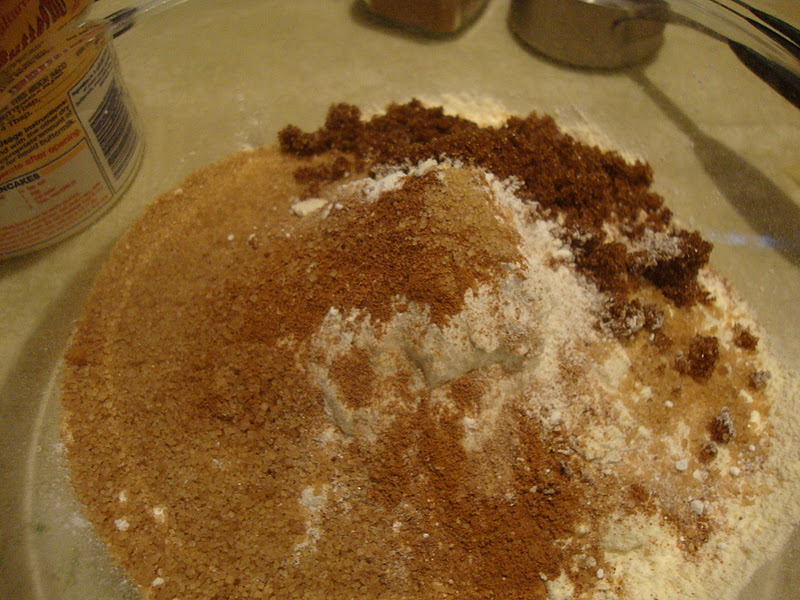
Quiche with Carmelized Onion, Eggplant, Chard, and Goat Cheese
Adapted from America's Best Test Kitchen
Having your crust be still warm when you pour the quiche batter in is crucial to having a firm bottom crust.
The Goods: Makes one 9 inch quiche
1 9 inch pie crust partially baked and still warm
2 medium yellow onions, halved then cut into 1/4 inch slices
1 1/2 cups swiss chard, roughly chopped
2 cloves garlic, minced
1 cup eggplant, peeled and diced in 3/4 inch cubes
1/4 cup goat cheese, crumbled
2 tablespoons olive oil
5 large eggs
1 cup whole milk
1/2 cup heavy cream
1 teaspoon fresh thyme, minced
1/2 teaspoon pepper
1/4 teaspoon salt, plus extra for sprinkling
Dash nutmeg

The Deal:
1. Start by Caramelizing your onions (click on the link to get step by step instructions). If you are pre-baking your crust, you can carmelize while your crust pre-bakes. The onions should be ready before the pie crust finishes pre-baking. Once you get your onions started, mix a teaspoon of salt into a bowl with your eggplant and let it dry out for 20-30 minutes.

2. Remove crust from the oven, and decrease oven heat to 350 (oven would be at 375 if blind baking crust). Heat 1 tablespoon of oil in a saute pan on medium high heat. When hot but not smoking, add eggplant, tossing frequently to cook until lightly browned, around 4-8 minutes.
Cooking eggplant and chard at the same time
3. At the same time in another saute pan, heat remaining olive oil on medium heat. Add garlic and cook until fragrant, about one minute. Add chard and saute, stirring occasionally until wilted, 3-5 minutes. Your onions should be caramelized at this point, just be sure to remove from heat.

4. While your vegetables are cooking in a large bowl whisk eggs, milk, cream, thyme, nutmeg, salt and pepper in a large bowl.

5. Once all your vegetables are ready, sprinkle eggplant, chard, onions and goat cheese on the crust. Open the oven and place your pie plate on the oven rack. Then gently pour the egg mixture into the shell until it reaches about 1/2 inch from the top of the crust (Depending on the depth of your pie shell you may have leftover quiche batter). Bake until the top of the quiche is lightly browned and a knife inserted comes out clean, about 40-50 minutes.
Add vegetables to crust first
Pour egg mixture on once pie is on the oven rack
Leave room at top for quiche to expand, then bake! 
6. Transfer the quiche to a baking rack to cool for about 10 minutes. Serve warm or at room temperature.
Insert fork and prepare for happiness. 

Tuesday, October 11, 2011

A little broccoli knowledge

I am making more of an effort to post articles/facts/general interesting information on food. My main focus is always recipes, but the more we can all learn about food, the better and healthier we will be.
Many people, including myself until recently, have no idea that the way you cook vegetables effects the nutrients your body absorbs.

NPR just posted an great article about broccoli, one of my very favorites vegetables.
Only takes a few minutes to read, but had great information . To cook or NOT to cook Broccoli.


Monday, October 10, 2011

Turnip the heat

Root Fries Anyone? 
Look at me making up recipes! Last week at the market I decided to buy some turnips as to force myself to find an easy recipe. I noticed turnips were one of the root vegetables that I had not played with in the kitchen. But if it's in season, Im doing my best to experiment. 
DA Turnip
Turnips aren't really winning any beauty food contests, they are boring looking. No offense turnips, but you know its true. I looked through many of my cookbooks and the recipes I found included roasted turnips, turnip mash, stuffed turnips, simple things like that. None of the recipes I read got me excited to make these white little root balls. So I began to search the web and found turnip fries. Well, I pretty much like anything that has FRY in the title, so I decided to give them a go. I've also been trying to play with Asian and Indian flavors lately, and this particular night I was making a Thai Curry (recipe coming soon). So instead of flavoring the turnips like a traditional fry, why not throw some cumin and coriander and see how it goes? I also happen to have this amazing fresh ginger (which I bought at the market a few weeks back) so grated a piece up and threw that in the mix. 
You will be fries someday! 
My cooking ego is about the size of a turnip (teeny tiny), but I was freakin proud of these little guys. Simply, healthy, and almost all the ingredients are items most basic kitchens will have. 

As far as what oil to use, I usually have at least 4-5 different types, but feel free to use vegetable oil, or any flavorless oil you have in the pantry. I enjoyed the depth of flavor the peanut oil brought, but no need to buy it just for this recipe. Same goes for ginger.

What's neat about this recipe is using Indian spices with a fairly American vegetable. Of course these spices would be delicious on regular or sweet potatoes, but mixing up your vegetables is always a good idea. Variety is the spice of life! 
These would be a great side to almost anything. They require little in the kitchen time, and I dare you to just eat one. 
Hope yall like these as much as I do. Healthy boyfriend has already requested more :)

Turnip Fries with Cumin, Coriander and Ginger

The Goods: serves 4-5 as side
3 pounds turnips, peeled
1 tablespoon grapeseed oil (vegetable is fine)
1/4 tablespoon peanut oil (optional)
1 teaspoon cumin
1 teaspoon coriander
1 teaspoon fresh ginger, grated

The Deal: 
1. Preheat oven to 425 degrees. Chop turnips into fries, which will vary depending on the size of the turnip. I sliced my turnips in half, then turned the turnip half sideways and made a vertical cut. Keeping the top and bottom together, I then made 1/4 inch slices, see picture below.

2. In a bowl combine both oils, cumin, coriander and ginger. Place turnips in and with your hands toss to combine, being sure the spiced oil is evenly distributed to all the fries. 


3. Place on a large cookie sheet (use 2 if you need more room) being sure the turnips aren't overlapping. Bake for 20 minutes or so, flipping the fries at least once to ensure even browning. Remove when golden brown and crispy. Serve warm!