Showing posts with label dinner. Show all posts

Wednesday, February 8, 2012

Fancy Mac and Cheese? Oh yes.


Hot Damn if I don't feel fancy every time I say Gratin. This dish is simple to make, and can be as fancy, or as simple as you want. I chose to make my own sauce because it was Saturday and I had the time. Feel free to use store bought sauce, just pick out a good quality one. I loved the smoky flavor the Sofrito added to the dish, but again it's up to you how complicated you want to get, jarred sauce saves you a good amount of time. I used goat cheese because I ran out of parmesan, but again this is a flexible dish, so use cheese you know and love. I love dishes that make it easy to eat vegetables, and since its similar to mac and cheese this is wonderful to serve to both kids and adults.

Penne and Cauliflower Gratin with a Spicy Tomato Cream Sauce

The Goods: Serves 4-5 as main dish
1/4 cup goat cheese or parmesan
1 small cauliflower (about 4 cups), cut into small florets
1/2 pound whole wheat penne
1 1/4 cups chunky Sofrito or store bought marinara sauce
1 cup half and half or 2% milk
1 garlic clove, minced
1/4 teaspoon crushed red pepper flakes
1/2 cup finely chopped basil or parsley
1/4 teaspoon salt
1/4 cup fresh bread crumbs
1 tablespoon olive oil

The Deal: 
1. Bring a large pot of water to boil. Drop in the cauliflower and cook five minutes, or until just tender. Scoop it out with a strainer and drop it into a 2 1/2 quart casserole. Preheat the oven to 400 degrees.

2. Drop the penne into the water and cook until al dente, about 10 minutes. Drain it in a colander and shake to remove all moisture. Mix it into the cauliflower.

3. In a large bowl mix together tomato sauce, milk, garlic, red pepper flakes, basil, cheese and salt. Pour the sauce into the casserole dish and toss well to mix the sauce, pasta and cauliflower.

4. Combine the bread crumbs and olive oil in a small bowl and mix until evenly moistened. Sprinkle all over the gratin. Bake 20-25 minutes, or until hot, bubbly and golden on top. Let it sit for 5 minutes before serving.

Tuesday, January 10, 2012

Its a freakin breeze being a green bean casserole.

NUMMY! I like the reflection in the pan. I'm so artsy. :)
Lady's and Gents, this is one of my all time favorite things. I don't mean favorite foods, I mean favorite THINGS. I LOOOOOOOUUUUUUVVVVVE green bean casserole, really I would eat it every day. Creamy mushroom sauce, tender green beans, finished off with crispy onions, that's a mouth full of happy right there. I'm sure people exist who don't enjoy the GBC but I choose not to believe that. I've heard rumor of people that don't enjoy chocolate, which just HAS to be a lie. What's next, people who don't like good sex or laughing?

Green bean casserole takes me back to a time I hated all vegetables. Wouldn't touch them unless enticed by some fried chicken finger and/or nugget. Yet every Thanksgiving I welcomed a heaping scoop of green bean casserole on my plate. Sure it was mostly cream of mushroom soup and french's onions, but still I took immense pride that on Thanksgiving, the holiday of gluttony, my favorite indulgence actually had vegetables in it. It was only when I went to college I learned green bean casserole was a southern dish and not a staple on every Thanksgiving menu. I quickly introduced the wonder that is the cheap and easy green bean casserole to my friends still not knowing how incredible REAL made from scratch green bean casserole tasted. First I switched to fresh green beans, and will never pick up a can of green beans again. (I mean I might, but I'm trying to make a point here.) Then I figured out the sauce, but was still relying on those french's crunchy onion rings, which seem to be mostly batter. I know they are delicious, and lets just say I've eaten more than one can sitting in front of the TV watching Buffy or something equally awesome, but they are nothing but junk. Making your own onions is surprisingly easy and just, if not more, crunchy and tasty.

My point sweet readers, is this is a traditional southern dish, that EVERYONE should try. And if you are going to make it, best make it from scratch. No canned green beans or french fried onions here. Nope fresh vegetables, flour and cream make this dish heavenly, without adding icky chemicals to your body. This is often a side dish as it uses a cup of half and half, so is fairly rich. Using fresh green beans, onions and mushrooms increases the nutritional value of this dish, but it's not what I would call healthy. I would call it an instant hit at potlucks and the way to a person's heart. Or stomach at the very least. Hope you enjoy it as much as I do!

Onions coated with flour
Onions baked and crispy. No eating yet!
Mushrooms sautéing
Simmering in broth
Getting creamy in half and half
Bring all your ingredients together, bake and serve!
Green Bean Casserole
Based on Alton Brown's No your mommas green bean casserole.
This time, Im not dreaming. It's really here!
The Goods: Serves 4-6 as a side dish

Topping: 
2 meduim onions, thinly sliced
1/4 cup all purpose flour
2 tablespoons panko bread crumbs
1 teaspoon kosher salt
Non stick spray

The Sauce: 
2 tablespoons unsalted butter
12 ounces mushrooms, trimmed and cut into 1/2 inch slices
1 cup vegetable broth
1 cup half and half
2 tablespoons all purpose flour
2 garlic cloves, minced
1/4 teaspoon nutmeg
1 teaspoon salt
1/2 teaspoon freshly ground pepper

The Green Beans: 
1 pound green beans, rinsed and trimmed
1 gallon of water
2 tablespoons kosher salt. 

The Deal: 
1. Preheat the oven to 475 degrees. Combine onions, panko flour, and salt in a large bowl and toss to combine. Coat a sheet pan with non stick spray and evenly spread out onions. Bake until golden brown, tossing every 10 minutes, for approximately 30 minutes. Once done, remove from oven and set aside until ready to use. Once you remove the onions turn the oven temperature down to 400 degrees. 

2. While the onions are cooking, prepare the beans. Fill a bowl with ice and water aka make an ice bath. Bring a gallon of water to a boil with two tablespoons of salt. Blanch aka boil the green beans for 5 minutes. Drain in a colander and immediately put beans in the ice bath to stop cooking. Once cool, drain and set aside.

3. Now to make your sauce! Melt the butter in a large saute pan (that can also be used in the oven) over medium high heat. Add the mushrooms, salt and pepper and cook, stirring occasionally, until the mushrooms begin to give off their liquid, 4-5 minutes. Add the garlic and nutmeg and continue to cook for 1 to 2 minutes. Sprinkle the flour over the mixture and stir to combine. Cook for one minute. Add the broth and simmer for 1 minute. Add the half and half, stir and cook until the mixture thickens, around 6 to 8 minutes.

4. Remove from heat and stir in the green beans and 1/4 of the onions. Top with remaining onions. Bake in saute pan at 400 degrees until bubbly, 15-20 minutes. Serve immediately. 

Wednesday, October 5, 2011

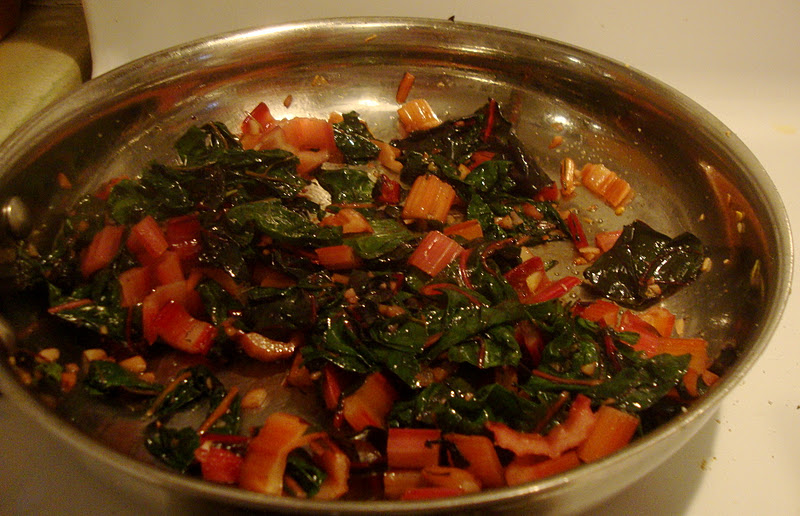
Swiss Chard: 1, Lysandra: 0


Two Steps forward, three steps back right? That's what they say and that's how I feel after eating Chard. After eating vitamin E, C, K, iron, magnesium rich, cancer preventing Swiss Chard, I am sad to say I still don't like the taste of it. Cooked spinach is my nemesis, I HATE the way cooked spinach tastes. I love it fresh, or even cooked into a pie or quiche, but on it's own....UGH. Frustrating that I have conquered my aversion to so many other vegetables, yet cooked greens such as Chard, Kale, and Spinach, continue to repulse my taste buds. Frack.

Healthy boyfriend of course, Mr. I love everything that taste nutritious, adored this and commented on what an extremely healthy meal it was. Which is true and everything besides the flour for the gnocchi was from the local market; a great accomplishment in itself. I know I can grow to love this stuff, perhaps I have to take baby steps? I will trying baking it in a quiche soon, a little egg and milk to help it go down easier. Not the healthiest option, but perhaps it will help warm my taste buds up to the flavor.

My intention when making this was to pair the Sweet Potato Gnocchi, that has a nice cinnamon sweet taste with the garlic earthy chard, balancing out the flavors. Healthy boyfriend thought it worked great, while I mostly nibbled on gnocchi. I will try cooking broccoli this way soon, and I'm sure I'll be licking the bowl.

This recipe comes from Simple Vegetarian Pleasures. I wish I knew how Jeanne Lemlin is reading my future from the past, but every time I need a recipe, she is there. Her books are simple genius, go buy them. If you know you like Chard, this is a very simple and delicious way to make it. Im sure anyone with normal healthy taste buds is sure to enjoy it.

Swiss chard is another vegetable adding bright rainbow colors to farmers market tables right now, another reason to visit your local market!

Garlic Rainbow Chard
Purdy Colors
You can really use any dark green vegetable, kale, collards, broccoli would all be delicious. 


The Goods: 
1 pound Swiss Chard with stems
2 tablespoons parmesan cheese, grated
4 tablespoons olive oil
4 garlic cloves, minced
1/4 teaspoon crushed red pepper
1 pound Sweet Potato Gnocchi or store bought
1/4 teaspoon salt
Pinch freshly ground pepper
1 teaspoon fresh rosemary, minced

The Deal: 
1. Chop the steams of the chard. Rinse stems under running water to get rid of any sand or dirt. Repeat with leaves. Chop steams into 1/2 inch pieces, and gather leaves into bunches and chop them into 1/2 wide strips.

2. Heat 1 tablespoon olive oil in a large skillet over medium high heat with rosemary. Heat until hot but not smoking. Add gnocchi and cook until browned, about 3 minutes on each side. If you prefer your gnocchi boiled, you know, do it that way.

3. In another large skillet heat 3 tablespoons olive oil on medium heat with the garlic and hot pepper flakes. Cook one minute then add the chard leaves and steams. Toss to throughly combine then cover pan. Cook, tossing occasionally, until the chard is just wilted, about 3 minutes. Season with salt and pepper to taste.

4. Serve gnocchi and greens in one bowl and sprinkle parmesan on top.

Tuesday, October 4, 2011

Oh Gnocchi you didn't

You want it.
Ok yall, this is a long but super high five yourself worth the effort project. For homemade pasta, this is as healthy as it gets. Sweet taters and whole wheat flour, I mean talk about your wholesome pasta treat.

I'll admit it. I'm a gnocchi addict. I've tried to cut back, but I JUST CANT STOP. It's become one of my go-to's this summer when I have no idea what to eat; Homemade spinach pesto and store bought gnocchi, with a side of steamed broccoli. The problem is I either buy slightly pricey gnocchi at the farmer's market or slightly processed gnocchi from the grocery store.
Well those days are over. Homemade gnocchi here I come. I found this recipe on a blog I recently discovered, Kath Eats Real Food. Click on the link and find a ton of healthy recipes, adorable photos and general sillyness. Great site to explore!
Good to have red wine to get you through :)
Sweet potatoes are one of my favorite vegetables because they are so freaking good for you, while still being delicious no matter how you serve them. Sweet, savory, fry like, it's nearly impossible to mess them up. They are crazy high in beta carotene which is full of Vitamin A and C. They also have vitamin E, and are high in fiber (which many of us need more of). In general they are the BOMB, and should be a staple vegetable in your house. Especially right now, its sweet potato season yall!

In researching a good site with nutritional information I found this Sweet Tater Facts, which is a North Carolina Commision on sweet potatoes. What do their meetings look like? Are they all, "I agree, Ill have sweet potatoes fries with that!" or "I do not agree with you, please take your sweet potato casserole out of my sight." One can only spend too much time wondering.......

Nothing in this is hard, just time consuming. Definitely a weekend project for any full time 9-5ers. Luckily unless you are making these for a large group, you will have plenty leftover to freeze, and then you have gnocchi whenever you want it.
My goodness, is this ANOTHER reason to visit your local farmer's market? I think so!

Sweet Potato Gnocchi
Gnocchi on a bed of garlic rainbow chard. Nom Nom. 

The Goods:
2 large (about a 1.5 pounds) sweet potatoes
1 egg
1 1/2-2 cups whole wheat flour
1 teaspoon cinnamon
3/4 teaspoon kosher salt
1 tablespoon grapeseed oil
1/2 teaspoon rosemary, minced
Dash nutmeg (optional)

Any Sauce you like with gnocchi. I'm a Spinach Pesto girl, but to each her/his own sauce. You can also serve it on a bed of garlic greens, recipe soon to come.

The Deal:
1. At 375 degrees bake sweet potatoes for about an hour, until a knife can be easily inserted. Overcooked is better than under, you want the flesh soft.

2. When ready, cut open lengthwise and open to cool for 10 minutes or so.

3. When cool enough to touch, peel of skins with your hands and place all potato flesh in a large bowl. Add salt, cinnamon, nutmeg, and egg to taters and stir to combine.
Taste, add more cinnamon or nutmeg if desired
3. Begin adding flour, starting with a cup and adding slowly to see if you're dough is forming. The dough should lose most of it's stickyness and when you push it with your finger it should only spring back a smidge (instead of completely molding to your finger.)

4. Turn the dough ball onto a flour surface and knead into a tighter ball. Use as much flour as you need to keep the ball from sticking to the surface and your hands.
Dough ball
Quartered
5. Quarter the dough ball and set each one aside. Take one quarter and roll into a long tube (make a snake sound if you wish, ssssssss!) It should be about as thick as your finger, but only if you can roll it that thin without the dough breaking. If your dough is breaking, pinch it together and stop there.
Gnocchi snake goes through the hole :) Healthy boyfriend likes to play with his food.
6. Cut the tube into about 1inch long nubs, and set aside. Repeat with remaining dough quarters. While you are rolling and nubbing (not a verb....yet!) bring a large pot of water to a boil.
These are already cooked, just notice the size of the gnocchi.
7. Prepare an ice bath (water+ice+bowl=ice bath). Add half the gnocchi to the boiling water and boil for about 4-5 minutes, until the gnocchi float up and start dancing with the rolling water. Remove with slotted spoon and plunge into the ice bath to stop cooking. Let the gnocchi cool off for 2 minutes and then remove to a separate container. Repeat with remaining gnocchi.

*At this point you can freeze them for later use. Spread on a cookie sheet with wax paper and freeze. Once frozen, place in a labeled ziplock. Then you have gnocchi for life.....or as long as they last. Thaw once ready to use.

8. When ready to eat, heat oil in a large saute pan with the rosemary. When hot (aka you flick water in the pan and it sizzles) add your gnocchi and coat with oil. Get a good crust on each side, about 3 minutes per side. Remove when lightly browned.

Sit back, relax and let the compliments roll in.

Tuesday, September 27, 2011

Butternut Squash Soup

 I heart soup.
Food has a way of comforting my soul. A warm bowl of soup on a cold frustrating day slowly slides down every limb, filling me with a calm I cannot find anywhere else.

In the unforgivably frigid winter months in Boston, I lived on vegetable soup. I wanted it every night, with crisp buttery toast or saltines. Of course back then I ate Campbell's vegetable soup and would pick out the "vegetables" which are barely anything but mush and HFCS at that point. Though when you desire soup, nothing else will do.

This past Saturday I felt miserable. Mistake number one was going to the farmer's market before I'd had coffee or eaten. After about 15 minutes of shopping, I started to feel dizzy and hateful of all things that weren't coffee. I scarfed down a breakfast sandwich from a local vender and begrudgingly sipped on some watery suck ass coffee, but still my head ached and my body yelped to stop moving.

Determined to buy new fall vegetables, I spent more time than I should talking and buying from the farmers, finally taking myself home to rest. And by rest I mean clean, recipe plan for 2 hours and grocery shop some more. Finally around four o clock I forced myself to lay down, but only for a bit because I had promised healthy boyfriend a fresh local meal prepared by yours truely.
Hey squash, looking pretty cute. 
After cooking for about 2 hours, I felt a bit better, though still grumpy and nautious. Healthy boyfriend called to inform me he was running late. Frustrated but trying to keep calm, I finished most of the dishes and was thankful I chose soup, because it smelled happy simmering in its pot. An hour after the initail late call, I recieved a text he still had not left. My mood was edging towards passive aggressive land which equals a no fun evening all around. It never feels good to spend a long time cooking and have someone show up late. At the same time, I did not fall in love with healthy boyfriend for his being on time skills. When he arrived he knew I was pissed, the oversized kale chip on my shoulder made that clear.
Luckily within the first bite of this soup I felt better. I could feel the silly frustrations melting away, and all that was left was a rich butternut taste.
You did it again soup. Well done.

This is the first, of what I imagine will be many butternut soup recipes. Different herbs, perhaps an apple or pear, and homemade broth can transform a soup. Butternut squash is another vegetable peaking its large penis shaped form out of baskets on every table at the markets. This squash is available for most of the winter, and the hardest thing to do is slice it. I try to buy smaller squashes, because the 2 pounders require the muscle of healthy boyfriend. Im not saying Im weak, but those squashes don't play.

Most traditional butternut soups add cream or buttermilk at the end, making it even creamier. I did not include this step because I was curious to see how it tasted without the cream. Fan-squash-tastic is how. Im sure the cream would enhance the flavor, and I'll try it one of these days, but for now I'm happy leaving the cream for my coffee. I believe the rice helped add starch and a richness to the soup that usually comes from cream.

Anyone can make this soup, and I encourage everyone to get their own penis shaped vegetable, make at least 3 inappropriate jokes, and then simmer away.

I forgot to use the parmesan, so it is not pictured below. I FORGOT to use cheese, thats how annoyed I was. Anyway Im sure it's delicious, I enjoy licking parmesan straight out of my hand, so no doubt in this soup it's nutty and rich. I did use the kale chips I made the same night, which added a nice green to this orange soup. A good one to keep in mind for halloween.

This recipe brought to you from a few sources. Part Jeanne Lemlin's Vegetarian Pleasures, Part America's best test kitchen family style, and part me!

Butternut Squash Soup
B Soup with Kale "Chips" or Kale-tons?
The Goods: Serves 4-6
2 tablespoons butter
2 medium onion, diced
3 garlic cloves, minced or pressed
1 tablespoon fresh thyme, minced
A good dash of nutmeg
6 heaping cups (about 2 1/2 pounds) butternut squash, peeled and diced
8 cups vegetable broth
1/2 cup white basmati rice
1 teaspoon salt
A few good dashes of fresh ground pepper
Freshly grated parmesan

The Deal: 
1. Heat butter in a large stock pot over medium heat. Add the onions and garlic and saute until onions are golden, about 10 minutes.

2. Pour in the stock and bring to a boil. Stir in squash, rice, thyme, nutmeg, salt and pepper, and bring soup again to a boil, stirring often. Reduce it to a simmer and cook it about 35-45 minutes, until the squash and rice are very tender.
Must use a big pot.
3. Once ready, puree the soup in batches (careful not to fill up your blender, hot liquid expands) in a blender or food processor. Return pureed soup to pot and keep on low heat until ready to serve. Serve with freshly grated parmesan cheese, and additional nutmeg if desired.

This soup will keep for several days, though it made need additional broth when reheated on the stove.

Wednesday, September 21, 2011

Roasted Fall Vegetables

So cute.
Fall is here! Which means fall colors, in all their vibrance and rich earth-tones, reminding us that every end means a new beginning. Crunchy leaves, pumpkin pie, and stained-glass landscapes make this season magical. Luckily the farmers markets are open until November, so we still have plenty of time to enjoy the autumn harvest!
The season's colors even come out in the FOOD: orange squash, purple potatoes, red onions, and dark green kale; everything at the farmer's market screams fall!
I mean this could be a painting..a delicious painting....
Last week at the market I spotted this adorable (albeit phallic) butternut squash and just had to have it. Good local vegetables need little more than heat and oil to become delicious. I am a fan of roasting vegetables, but you can always sauté them in a pan. This recipe is just vegetables I happened to see while walking around; just use what is local in your area. The dressing is a local-made Greek-style dressing that makes all vegetables super crazy yummy, but again, use what you have. Like I said above: think simple. Olive oil, a little vinegar, and a fresh herb or two can go a long way. You never want to overpower the dish, what I like about this Greek dressing is that it isn't overpowering. The dressing gives the vegetables enough oil to keep them moist, but you still taste the natural flavors. Do not miss out on all the incredible root vegetables in season right now. As the “storage bin” for a plant’s nutrients, root vegetables are powerhouses of vitamins, phytonutrients, and complex carbohydrates. (curious about root vegetables? Click that last sentence!) This dish, or any roasted vegetable is as easy as it gets, and will please vegetarians, vegans and meat eaters alike. Go do it now! Now, I say!

Roasted Fall Vegetables
Not as colorful once cooked, but the flavor pops!
The Goods: Serves 2-3
1 medium butternut squash, peeled and cut into bite sized pieces
1 large red onion, sliced into eighths
3-4 medium red and blue potatoes, scrubbed and cut into bite sized pieces
1 tablespoon of Greek Vinaigrette, (olive oil and balsamic vinegar works too)

The Deal: 
1. Preheat oven to 375°F. While you're waiting, place all your vegetables in a large bowl with the dressing. Mix well to coat evenly adding more dressing if needed.
They are all dressed up! Someone stop me.....
2. Place all your vegetables on a large baking sheet and bake for 20-25 minutes, until the onions are lightly browned and a fork is easily inserted in all the vegetables. Rotate the vegetables at least once to ensure even baking. 

Serve warm over rice, couscous, quinoa or just eat straight. Vegetables 4-EVA!

Tuesday, September 13, 2011

Pizza Two Ways: Peach, Tempeh Bacon, & Goat Cheese or Margarita

Two different pizzas united to defeat bland flavor
Certain foods are a part of me. As much as I try to change my eating habits, more vegetables, less cheese and bread, I am atomically drawn to pizza. Many of my eating habits come from the foods I loved growing up, and I don't think there was a week in our house where we didn't have pizza. Compared to many normal American households, we ate fairly healthy, but my mother is a fan of cheese and bread. And in turn, so am I. Vegetables and healthy food were staples as well, as Mom was a vegetarian most of my childhood.

 My poor mother had a the most stoubborn daughter (that's me) when it came to eating vegetables. If it wasn't fried, smothered in cheese, or involving barbecue sauce I refused to eat it. Even when forced to eat vegetables, I would often go to the bathroom after dinner and vomit them up. REEEEE. DICULOUS. Thank goodness I had other good qualities, because I have no clue how she put up with me all those years. I was a terror at the dinner table. Not until college and traveling did I open my culinary mouth to all the remarkable tastes out there. I remember my mother came to visit me in Holland, where I studied abroad for a semester, and was shocked to see me eat food without knowing what it was. A mother's patience finally rewarded.
Holy peaches this was a good pie.
Margarita (with needed to be used mushrooms)


All that being said, it still feels wrong to go a week without pizza. Im always working on making them healthier, but I still like cheese on my pizza. I see those vegan almost all vegetable pizzas out there; well done to those who can eat them and be satisfied, but a pizza without cheese is like summer without strawberries. Now making my own sauce and dough, and using all vegetarian toppings does makes it healthier, but it's still no salad on a tortilla. Yes, I saw a recipe for "pizza" that was literally a whole wheat tortilla with a tablespoon of sauce, mixed greens and like 5 different steamed vegetables. Call me fat, but that AINT pizza to me. Thats a salad with a tortilla bowl. 


Margarita pizza is the most classic type of pizza, showcasing what makes a pizza great. Good mozzarella, quality sauce and basil, its all you need. I added mushrooms because I had some about to be wasted, as always better to eat it then trash it. 

The second pizza was possibly one of the best pizzas I've ever had. For someone who's eaten pizza almost every week for 27 years, thats SAYING something. Peaches, goat cheese and tempeh bacon, my mouth is literally mouth dreaming about it right now. Healthy boyfriend was skeptical, in fact said "Peaches on pizza? Really?" To which I replied, "Really!" and the rest was delicious history. He hates pineapple on pizza ( I know who IS this guy?) but he loved this peach pizza creation. Combined with the goat cheese and tempeh bacon, yall I am telling you, you NEED to make this pizza. You're mouth and happy tummy will thank you. 
Never thought you would make your own pizza crust and sauce? Well neither did I! Honestly it was cheaper than buying the same pre-made items, and just took a little time and effort. Dough does have to rise for at least an hour, but it only takes 10 minutes to make, so you can let it rise while preparing the rest of your meal. Use bread flour if you can, it has the most protein of any other flour, which makes a difference in the oven. All purpose will work, just not as well. Nothing was difficult, just needed a little forethought. If you are one for potlucking or cooking with friends, making your own pizzas never fails. Everyone brings ingredients, you prepare the sauce and crust, and viola, fun times ahead!

Pizza Two Ways: Peach, Tempeh Bacon, & Goat Cheese or Margarita


The Goods: Makes two 10 inch pizzas
1 recipe homemade pizza dough (see below) or store bought

Quick Pizza Sauce:
1 tablespoon extra virgin olive oil
1 medium onion
1 28 oz can crushed tomatoes
2-3 small cloves garlic
salt and pepper to taste
Crushed red pepper (optional)

Toppings:
12 ozs of fresh mozzarella, thinly sliced
1/2 cup freshly grated parmesan
1 large ripe peach, peeled and sliced 1/4
1/2 cup mushrooms, thinly sliced (optional)
4 slices hickory smoked Tempeh Bacon
1/2 cup goat cheese
1/2 cup fresh basil, chiffonade

The Deal: 
1. On medium heat, place olive oil in a large pot with garlic and crushed red pepper, if using. Saute until aromatic, about one minute. Add onions and saute until translucent, about 10 minutes. Add crushed tomatoes and simmer until sauce thickens about 20 minutes.
Sauteing onions

Sauce! 
2. While you sauce is cooking, fry your bacon. Heat a dash of grapeseed oil in a medium saute pan on meduim high heat. When oil is shimmering, add bacon and fry until crispy, about 2 minutes on each side. Set aside to cool and then crumble. Begin to roll out your dough into two 10 inch round doughs. Be sure to make an inch border. Brush each dough with around a teaspoon of olive oil, being sure to get the edges. Preheat oven to 450 degrees, and place your cookie sheets or pizza pan in oven to warm.

3. Once your sauce is ready, remove from heat and let cool 5 minutes. To make margarita pizza, spread a thin layer of sauce over first dough, add mozzarella slices, mushrooms if using, and finish with parmesan. You will add the basil after the pizza is cooked. To make other pizza, spread sauce, then mozzarella, sprinkle peaches evenly, tempeh bacon, then finish with goat cheese.
Pizza One
Pizza Two
4. Place both your pizzas in the oven on pizza pans, or inverted cookie sheets. Cook for 12-16 minutes, rotating half way through to ensure even cooking. Remove from heat when crust and cheese are lightly golden brown. Sprinkle Margarita pizza with basil. Serve hot! But be careful of burning.

Simple Pizza Dough
The Goods: 
3 cups bread flour (all purpose will work), plus extra for sprinkling
1 teaspoon instant or rapid rise yeast
2 tablespoon olive oil, plus one teaspoon
1-1 1/4 cups warm water
2 teaspoon coarse kosher sea salt

The Deal: 
1. Combine the yeast, flour, and 2 teaspoons salt in a food processor or standing mixer. Turn the machine on and add one cup of water and 2 tablespoons of oil through the feed tube. Process for about 30 seconds, adding more water a little at a time until the mixture forms a ball and is slightly sticky to the touch. If dry, add water a little at at time.

2. Turn dough onto a floured work surface and knead by hand a few seconds to form a smooth round dough ball. Grease a bowl with remaining olive oil and place dough in it. Cover with plastic wrap or damp cloth and let rise in a warm, draft free spot until the dough doubles in size, 1-2 hours.

Wednesday, August 10, 2011

Sundried Tomato Pesto with Pan Fried Ravioli

Fried Pasta with Pesto and Roasted Asparagus. 
Fancy dinners get me so excited. Since I've started down this road of food enlightenment, my favorite thing to do for a special occasion is to cook something delicious that hopefully will fill that person(or persons) with a since of warmth and excitement. We all have are individual ways of showing our love, and for me cooking a good meal is about as loving as you can get (feel free to insert your own dirty reference here).

Healthy (and super wonderful) boyfriend had a birthday this weekend and I wanted to make something decadent, but didn't have a lot of time to plan or execute the meal. So of course I looked at my Simple Vegetarian Pleasures cookbook (aka my new book boyfriend) and found this simple and tasty dish that only took about an hour total. We were both feeling under the weather, so I did not want to spend all day in the kitchen when I knew we both did not have our normal appetites. In fact, healthy boyfriend ended up loving the meal, but being able to eat a bunch because of his sick tummy. That's what leftovers are for :)

I loved the taste, though I would like to tinker with it a bit next time. It was good, but I thought it lacked something I still can't put my finger on. Certainly use the pesto sparingly as a teaspoon goes a LONG way. The raviolis were silly yummy, and something Ill keep in my pocket for a quick appetizer. No shock that frying pasta makes it taste better, you can fry a sock and make it taste good(This is in no way an endorsement to eat socks). Oil and breadcrumbs, hard to go wrong with. I may try to add the pine nuts first next time, or even use another kind of herb. Panko breadcrumbs are the way to go, or use fresh made if you can. Normal store bough breadcrumbs work alright, but are so filled with chemicals and junk I avoid them.

Because I used loose sun dried tomatoes, they needed to steam first to soften them. If you use sun dried tomatoes in oil, just drain them and blend, no need to steam. Any reason to use my steamer makes me happy.

Finding quality ravioli without breaking the bank can be tricky. All the national brands I've tried are terrible, but who wants to spend $7-10 on a package of ravioli? Queens and movie stars, that's who, but I don't think either read my blog.
Mushroom and Spinach ravioli would both work great with this recipe, as would traditional cheese. Mine were from a whole foods, the 365 mushroom ravioli, which were fine, but nothing to write home about. Time did not permit me to go to the farmers market to get some local made ravioli, but in the future that is what I would prefer. Look around your neighborhoods and try to find a local homemade pasta, it makes a big difference in the taste.

Such a flexible dish, try it and see how easy it is!

Sun dried Tomato Pesto with Pan Fried Ravioli


The Goods: Serves 4-6 as appetizer, 2-3 as main course
The Pesto: 
1 1/2 ounces(about 10) loose sun dried tomatoes

1/4 cup olive oil

2 small garlic cloves, minced

1 tablespoon freshly squeezed lemon juice

2 tablespoons pine nuts

1/2 cup chopped fresh parsley

1 tablespoon grated Parmesan cheese

Salt and Pepper to taste

The Ravioli:
1/3 cupish milk 

5 tablespoonish dry (panko) bread crumbs

20 delicious ravioli, defrosted if frozen (pick some good ones!)

Oil for frying, olive or grape work great

The Deal: 
1. To make the pesto, steam* the tomatoes until soft, around 10 minutes. Remove and let cool.

2. Place tomatoes, oil, garlic and lemon juice in a food processor and puree until smooth. Add pine nuts, parsley, salt, and pepper and pulse until the mixture is almost smooth but has tiny pieces of these last ingredients. Scrape into a small bowl and then stir in the Parmesan cheese. Add salt and pepper if needed.
Maters, garlic, lemon juice and oil
Puree #1
Adding the rest of the ingredients
3. Ravioli time! Put the milk in a small bowl and the breadcrumbs on a small plate on the counter. Dip each ravioli in the milk, then coat both sides with breadcrumbs, just don't cover them completely. Place on a platter.
Dipping in milk
Lightly breading, no need to coat completely
Ready to FRY!
4. Cover the bottom of a large skillet with a little oil. Heat over medium heat until hot but not smoking.  Fry the ravioli in one layer (you may have to do this in two batches) until golden brown on both sides. Use tongs to flip them over as needed. Place on a paper towel covered plate to drain off oil.
Serve on a platter with about a teaspoon of tomato pesto on top of each of them. Garnish with a sprinkle of freshly grated Parmesan.

*Fairly certain everyone knows how to steam, but just in case. To steam tomatoes, place about an inch of water in a medium pot with a vegetable steamer, cover and heat on high until boiling. Once boiling, place tomatoes in the steamer, place lid on top and steam until soft, around 10 minutes.

Sunday, May 29, 2011

Fried Eggplant with roasted vegetables, goat cheese and strawberries

If only you could eat pictures.....

This dish is a play on what I did last week, because I couldn't stop thinking about how delectable it was. Anytime I find a flavor combo I enjoy that much, I want to try and see if I can improve on it. Making a dish healthier is obviously a goal of mine, so I wanted to replace the bread with a food containing more nutritional value. Whole wheat bread is great, but I never need more bread in my diet, I get PLENTY of that. 

This time I used eggplants and the outcome was extraordinary. The fried eggplants were tender, yet crunchy with the breading. Fried eggplant made a perfect base for this dish, and stepped up the dish in presentation. I think you could serve this to your meat eating friends and they would enjoy as much as any meat dish. The colors and layers look elegant, yet still fun and easy to eat. The combination of goat cheese, vegetables, and strawberries was heavenly as usual, this may be one of my new favorite dishes. 

Again about 50 percent of the ingredients were local, I am LOVING all the access to fresh local food. Makes cooking that much more fun and friendly to our sweet worn out environment. 

I hope you enjoy this as much as I did! 

To Dry an eggplant: Slice into 1/2 inch disks and place on a plate with paper towels. Place a pinch of salt on each slice and rub in on both sides. Place a paper towel over the salted eggplants and let drain for at least 20 minutes or up to 40 minutes. Remove salt from eggplants before cooking. 
Fried Eggplant with roasted vegetables, goat cheese and strawberries


The Goods: Serves 2-3 as main dish

Fried Eggplant:
1 large eggplant, sliced into 1/2 inch slices, dried(see note above)
1 large egg
1/2 cup white unbleached flour
1/2 cup breadcrumbs
1/4 cup grated parmesan
2-3 tablespoons grapeseed oil
Salt and Pepper

1 quart strawberries, sliced
8 ounces rosemary and fig goat cheese
1 large yellow onion, roughly chopped
2 medium zucchinis, sliced into 1/2 inch coins
1-2 tablespoons Greek Vinegrette dressing
Salt and Pepper

The Deal: 
1. Preheat the oven to 375 degrees. In a medium bowl combine onions, zucchini and 1 tablespoon of greek dressing. Make sure to evenly coat all the vegetables, add more dressing if needed. Set bowl aside.

2. Combine the flour and a good pinch of pepper on one plate. Beat the eggs in a shallow dish with a dash of water. Combine breadcrumbs, parmesan, and 1/2 teaspoon of salt and pepper in a third dish.
Your breading an eggplant station
3. Coat each slice of eggplant with flour and dip into the eggs. Remove the eggplant from the eggs, letting any excess drip off, and then coat evenly with breadcrumbs, pressing the breadcrumbs to adhere. Place on a large plate until all eggplant slices are coated.
Coat in flour
Excess dripping off

Breaded, ready to fry!
4. Place zucchini and onions on large baking sheet and cook for 10-15 minutes, turning twice during cooking time to ensure even browning. Remove once onions and zucchinis are lightly browned and fork slides in easily.

5. While the vegetables are cooking, place a large saute pan on medium-high heat with a tablespoon of grapeseed oil. Once water sizzles on the pan, fry 2-3 slices of eggplants at a time, being sure they do not touch in the pan. Fry for about 3 minutes, then flip to cook other side. Remove when breadcrumbs are slightly browned and fork slides easily in eggplant. Fry the remaining eggplants, adding additional grapeseed oil as needed. 

6. To plate your dish, place fried eggplant, a large dollop of goat cheese, your roasted vegetables, then a few slices of strawberries. Serve warm.
Such lovely spring colors!