Showing posts with label Chives. Show all posts

Thursday, November 10, 2011

Sweet Potato Pancakes

Yes, they are as good as they look
Sometimes a cookbook is so genius, I actively can't stop thinking about it. I bring it to bed with me and end up reading new recipes until way past happy bedtime. If you have never read the Moosewood Cookbook, you are seriously missing out on some fun creative food. It is an older book, but definitely a staple in many vegetarian kitchens. Including my mothers, which is in fact how I got the book. It went something like this:
Me: Mom I'm taking this book home.
Mom: No, that's my book Bunny, you can't take it.
Me: Name the last time you cooked something from this book.
Mom: I.... (pauses) Look, that's my book, you can't just-
Me: Listen, I need it more, I'll bring it back. Thanks!

And just like that I have a new book, that I am technically borrowing. Man kids are selfish, even when they are in their late twenties. Anyhoo back to the recipe.
So this recipe is so freakin tasty I'm sure to make it again soon. A bunch of vegetables, some egg and flour to hold it together, and wham! Delicious vegetable pancakes in 30 minutes or so. These suckers attracted me for a few different reasons, the largest being I had 90% of the ingredients already in my kitchen. All the vegetables used are still in season (depending on where you live obviously) plus I had local eggs and garlic just waiting to be used in something scrumptious. I've seen many vegetable pancakes and all seem to be fried in butter instead of baked. Of course I would like to avoid frying, but I mean it's all vegetables, what do you WANT from me? I want delicious vegetable pancakes, so frying in butter it is!
These little babies are delicious and take almost no time. I suggested in the recipe making them all at once and keeping the completed ones in a preheated oven until you finish cooking them all. I really can't imagine anyone one not liking these, even picky little kids loves these guys. Honestly sweet potatoes are kinda the whores of the vegetable family, every body wants a taste. Be sure you are serving a nice nutritious green on the side, green beans, broccoli, kale chips, anything green and leafy will do.
I will be blogging a BUNCH of recipes from the Moosewood Cookbook in the weeks to come. You are welcome, in advance. This post is kinda scattered, but the flavor of these pancakes is solid. A big thanks to my Mom for letting me borrow a new inspirational book. Huzzah for Mommas!

Your "batter"
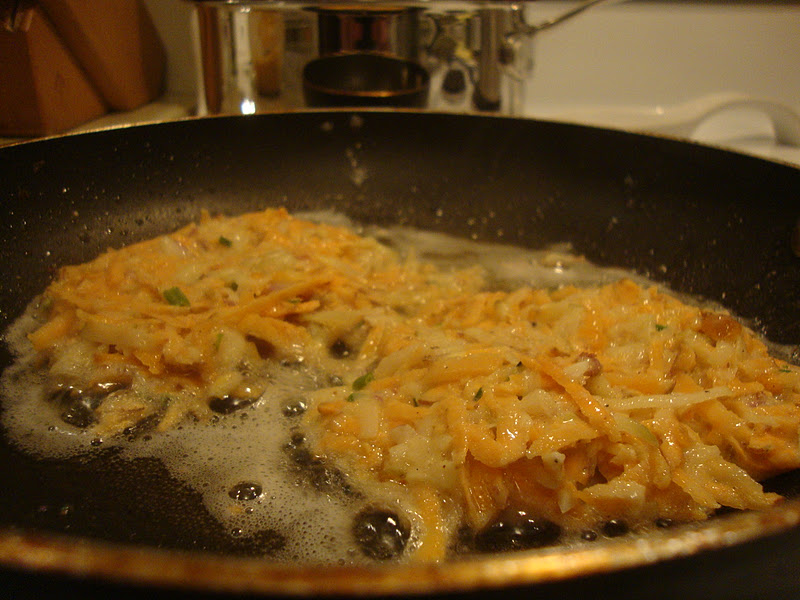
Frying them up
Lightly browned, crispy and vegetarian. Yum!

Sweet Potato Pancakes
Adapted from Moosewood Cookbook

The Goods: Serves 4-6
1 cup carrot, grated
1 cup white potato, grated
1 cup sweet potato, grated
4 eggs, beaten
1/3 cup flour
2 tablespoons onion, grated
1 garlic clove, crushed
juice of half a lemon
1/4 cup parsley, chopped (optional)
1 teaspoon salt
1/2 teaspoon pepper
Dash nutmeg
Unsalted butter for frying

Suggested topping:
1 cup sour cream or greek plain yogurt
2-3 tablespoons chives, minced
Dash of salt and pepper
Dash of lemon juice (optional)
Combine all ingredients

The Deal:
1. Place grated sweet and white potatoes in a colander over a bowl. Salt lightly and let stand 15 minutes. Lightly rinse and squeeze out well to get rid of all the extra water. Preheat oven to 250, and place a cookie sheet inside.

2. Toss all ingredients in a bowl and mix to combine. Heat enough butter to coat a large skillet on medium high heat. Once butter is hot, scoop a scant less than 1/2 cup of the mixture in your hand and flatten to make into pancake, then place in pan. Use a spatula to help form it (see pictures above). You should get 2-3 in a pan, fry on each side until golden brown, about 3-4 minutes per side. Repeat with remaining batter, adding butter as needed. Place finished pancakes in the preheated oven to stay warm until all are cooked.
Serve hot with sour cream or yogurt mixture.

Wednesday, November 2, 2011

Baked Sweet Potatoes with Ricotta Bruschetta and Caramelized Onions

Little bites of fall heaven
Creating recipes is tough, yall. This dish was inspired by a need to use up some food in my kitchen. It was a very make it up as I go type dinner that happened to work out well. Score, there is usually about a 50/50 shot of that. I knew I needed to use a half empty container of ricotta and already had flagged a recipe for ricotta bruschetta in one of Barefoot Contessa's cookbooks. The recipe called for the cheese mixture to be served on toasted bread, but I wanted to healthy that up a bit. That began the elaborate process of looking around my kitchen to see what else I could use. My eyes surveyed the bowl of local vegetables on the counter and honed in on some boring looking sweet potatoes. Of course we all know how far from boring sweet potatoes taste, but they are not lookers. Yellow onions hid underneath the sweet potatoes, just hoping to get thrown in the mix. My college roommate and I used to make these baked sweet potatoes that were so (oooooooo) good, and since I had local sweet potatoes I figured might as well combine two awesome recipes to see what would happen.

Success! Baked Sweet Potatoes topped with an herby ricotta mixture finished with sweet caramelized onions were in fact little bites of savory goodness. Baking the sweet potatoes gave them a lovely soft texture while the breadcrumbs added a needed crunch. The ricotta bruschetta was light and full of all the right herbs, while caramelized onions finished it off with a hit of sweetness. I'm sure I could improve on this recipe, and will certainly try, but for now it's pretty freaking good. It is a good main course, served with a side of green vegetables, but would also make a great appetizer. As an appetizer I would try to get small thin sweet potatoes as to make them bite sized. I used large sweet potatoes, which required a plate and a fork if you consider yourself fancy.
Sliced avocado was what I wanted to top these with first, but they were all rock hard and expensive at the grocery store. The onions were delicious, but I bet you could top this with fresh tomatoes, avocado, perhaps evenly lightly sautéed mushrooms. All the vegetables used in this (except the herbs) are seasonal, and the greens, browns, and orange are perfect fall colors to decorate your dinner plate.


Ricotta Bruschetta with Baked Sweet Potatoes
Adapted from my brain, with help from the Barefoot Contessa.


The Goods: Serves 4-6 as main course
2-3 large sweet potatoes, sliced 1/4 inch
2 cups breadcrumbs ( I prefer panko, just read the ingredients before you buy them)
4 tablespoons (more or less) of butter, melted plus 2 tablespoons for the onions
2 cups ricotta
3 tablespoons scallions white and green parts, minced
2 tablespoons fresh dill, minced
1 tablespoon fresh chives, minced
1 large yellow onion, halved and sliced in 1/8 inch slices
Kosher salt and freshly ground pepper to taste

The Deal:
1. Preheat oven to 375 degrees and grease 2 large cookie sheets. First caramelize your onions: In a large saute pan on medium high heat melt 2 tablespoons of butter. Add onions and saute until lightly browned, about 10 minutes. Stir frequently. Reduce heat to medium (or medium low depending on your burner) and cook onions until soft and browned, about 40 minutes. Only stir occasionally, but watch for burning. If they begin to burn reduce heat.

2. Set up your breading station. Place melted butter in a shallow bowl. Then place breadcrumbs and a good dash of salt and pepper in second bowl. Coat sweet potato in butter, letting excess butter drip off, then dredge in the breadcrumbs being sure it is evenly coated. Place on the greased cookie sheet. Repeat with remaining sweet potatoes. Bake until lightly browned and soft, about 20-25 minutes.

3. While sweet potatoes are cooking, make your ricotta bruschetta. Combine the ricotta, scallions, dill, chives, 1 teaspoon salt and 1/2 teaspoon pepper in a bowl.

4. Once your sweet potatoes and caramelized onions are ready, assemble your dish. Place 1 breaded sweet potato on the plate, followed by a heaping tablespoon of ricotta mixture, and finish with a a good dash of onions. Serve immediately.

Friday, September 30, 2011

French Green Beans with Herbs

Its so easy being a french green bean!
Oh boy it's haircot verts! Skinny mini grean beans that are so cute, I want to make clothes and hats for them. Unlikely I ever will because who has that kind of time? Guess I'll have to dress them up with butter and herbs, that's about as fancy as I get.

Haricot verts, aka french green beans, are in season right now along with their thicker counter part, good ole regular green beans. Green beans hold a special place in my vegetable heart, being they are one of the few vegetables I've always loved. Of course I used to only eat green beans when they were smothered in cream of mushroom and had crispy "onions" on top, but now I even eat green beans without the casserole. Not that there is anything wrong with green bean casserole, still being one of my favorites at Thanksgiving. Though now I'm just as happy eating green beans steamed, no cream needed.

I looked at a few different recipes for cooking haricot verts with herbs and they all looked as if they used roughly the same method. Par boil, place in ice bath, cook onions in butter, add the beans and finish with herbs. As far as the herbs go, if you have an herb garden use all the herbs I added. Each herb adds a nice flavor, but don't feel required to use every herb listed below, especially if you fear any unused herb is likely to be trash bound.

For me learning to cook is about being conscious of my food choices. So buying 5 different fresh herbs, using a tablespoon of each and then trashing the rest, is not what I call conscious eating. If you have a plan for the rest of the herbs, rock on, go get a satchel of each; but before you go to the store, think about each item you are buying and what you will be using it for. The waste in this country is frustrating, mostly because people don't think to care. Of course it's annoying to plan all your meals. Food is precious, but the wasteful path we as a society our on is not sustainable. So why not start thinking ahead? Everyone has their own unique excuse of why they "just don't have the time". Food, in one way or another, is essential to most living things survival. Food is literally life, why not treat it with the respect it deserves?
Well that turned it to a bit of tangent, but I hope you think about the ideas behind it. Sometimes I feel discouraged about the future and about the lack of foresight I see in humanity. One meal at a time I suppose.

Getting back to green beans, feel free to use the herbs you have. I used parsley and chives, because those were the only two healthy boyfriend could find at the market. Listed below are all the recommended herbs, but my previous paragraph said enough about using herbs the smart way. This is simple way to serve green beans if you are having guests and want something that looks fancy, but is easy and quick. Cooking the onions first gives them time to caramelize, which obviously adds a light sweetness to the dish. In general I don't go to this much trouble for beans, being happy to eat them steamed, but now I have a go-to side for future dinner guests. Now I just need more guests.....

This recipe is adapted from a few different sources and can be used with traditional green beans. But remember if you get french green beans you can practice saying "Haricot Verts" in the most ridiculous french accent you can think of. Worth it.

French Green Beans with Herbs

The Goods: Serves 4 as side dish
1 pound thin green beans (haricot verts) trimmed
1/2 cup red onion, diced
3 tbsp butter or earth balance
2 tbsp fresh thyme leaves
2 tbsp fresh parsley, chopped fine
2 tbsp fresh chives, chopped fine
2 tbsp fresh basil, chopped fine
Salt and pepper to taste
Lemon Wedges (optional)

The Deal: 


1. First we blanch (a fancy way to say boil, chill and slowly reheat vegetables): Bring large pot of salty water to a boil. Fill a large bowl of ice with water. Boil the beans for 2-3 minutes until tender but still crispy. Quickly remove beans with slotted spoon and plunge into ice bath to stop cooking and retain the color. Pat dry with cloth or paper towl.

2. In a large saute pan heat butter on medium high heat. Cook onions until translucent about 3-5 minutes. If you desire the onions caramelized cook an additional 2 minutes until lightly browned. Add the green beans, tossing to evenly coat with butter. Cook until tender about 4-6 minutes.

3. Add herbs, salt and pepper, and toss to combine. Cook for an additional minute.

Serve hot with lemon wedges on the side if desired. Eat with your fingers if extra sillyness is needed.

Thursday, May 5, 2011

Goat Cheese with Garlic and Chives and Spinach Pesto

Does anything NOT go with goat cheese
Last minute dishes stress me out. Try as I may to be cool as the healthy cucumber, I still get my apron in a knot when I need to prepare something on the fly for a large group.

Healthy boyfriend had a housewarming party and I only had an hour to shop and prepare a dish for an unknown number of people. The converstaion went something like:
Healthy Boyfriend(HB): Yeah, so people are coming over around 7:30
Me: Ok, how many people?
HB: Ummmm, yeah no idea. Some, maybe...Maybe a lot.
Me: What kinda food are people bringing?
HB: The kind you eat. I dont know, food.
After that I got off the phone because I knew I was cooking blind. Healthy boyfriend rarely cares about the details of his food, his attention for detail stops at the nutritional information.

So while often no guidelines can be exciting for creativity, I like knowing a LITTLE about the type of food I am suppose to bring. At the same time, food is about showing your love and you can't do that if you let the stress eat at you, pun INtended. Perhaps silly, but for me potlucks provide the opportunity spread some love in the world. A chance to give a best friend or a total stranger a moment of bliss.

So I let my brain kick around things that I love eating no matter what, and of course dishes that could be prepared in 20 minutes or less. I had to have time to shop and since I spend my days running around, I needed to at least have a few minutes to change out of my gross clothes.

I did not want to make something that was expensive or complicated because if no one came to the party, I would be grumpy about it. Never set yourself up for disappointment, an important lesson in cooking. Oh yeah, and life too.

 I wanted something that I could reuse, in case there was leftovers. I hate hate HATE throwing away food. Of course it happens, but it shouldn't. Food may not be as precious as air to many of us, but the vast majority of people in this world will never know a full belly, and to waste food seems cruel and ungrateful. Maybe thats dramatic, but I feel its part of the gratitude we should all feel for the food that is so readily available to many of us.

So all this pondering lead me to my two dishes. I will post them both, but I did not get a picture of the pesto, I was in a rush as I said, so totally forgot. The pesto I have already done, though this time I added arugula, because I had some on hand, and it was a real treat. The arugula added a nice peppery spice to the overall flavors of the dish.

Fresh and simple ingredients
The goat cheese could not have been easier or more delicious. Then I used whole wheat pita triangles, lightly toasted, for my dippers. I wish I got a picture of my two dishes together, because they were soooooo cute! I even wrote what they were on masking tape and placed the tape in front of the bowls so people knew what they were. These days I lean on the adventure side of eating, but for many years if I didn't know it, I didn't eat it. Its a good idea to find a neat, cute way to label your food if you are having a potluck. Now I was mocked a bit, being one of the only people that made something for the party and definitely the only one who labeled it, but I took any mocking as a compliment. I bring class where I go, jealously is bound to follow. :)

Fyi, when I list chives I mean the herb and not green onions or scallions. I used to confuse the two, but chives is a herb, scallions are a type onion. You could also use dill or basil, if you have fresh herbs, use them. I had some sesame seeds so I threw them in, get creative!

Goat Cheese with Garlic and Chives and Spinach Pesto
Looks boring, tastes DELICIOUS!!
The Goods:

Goat Cheese Dip: makes about 2 cups
2-3 large cloves of garlic, pressed or minced
1 10. 5 ounce tube of goat cheese, softened
1/3 cup fresh chives, thinly sliced
1 tablespoon sesame seeds(optional)

Spinach Arugula Pesto(not pictured): makes 3 cups
1 1/2 cups fresh spinach
1/2 cup fresh Arugula
1 cup basil
3 tablespoons pine nuts, toasted
2 garlic cloves, chopped
1/2 cup freshly grated parmesan cheese
1/2 tablespoon freshly squeezed lemon juice
3-4 tablespoons olive oil
sea salt and fresh ground pepper to taste


6 whole wheat pita pockets, cut into triangles; Each pita pocket cut into 12ths


The Deal: 
1. First make your goat cheese. If your goat cheese is not softened, place it in the microwave for about 10 seconds, just enough to barely soften it. Add garlic, chives and sesame seeds and mix until combined. Place in refrigerator and let sit for as long as you have. 
2. Then make your pesto. Place pine nuts, garlic, spinach, arugula, and basil in a food processor until it forms a rough paste. With the food processor running, slowly drizzle the olive oil until it forms a smooth paste. Place pesto in a bowl and stir in parmesan and lemon juice. Add salt and pepper to taste. 
3. At the party, preheat the oven to 350 degrees. Lightly warm your pita triangles right before serving the dips. A light toast makes a noticeable difference.
Be ready to recieve praise. Grab a pita and dip into yo dip!!

Monday, February 14, 2011

Egg Salad Sandwich

Its the incredible, edible, Egg Salad Sandwich! This weekend while looking in the fridge I noticed I had a lot of eggs and needed to use them.

They are very good for you in moderation. I wouldn't recommend eating them every day, unless you are very active. I always think of Gaston in "Beauty in the Beast" eating all those eggs and singing. If you look like Gaston, then you can eat lots of eggs. :) They are famous because they have lots of protein for their size.

Egg Salad was something I didn't like until I had a REALLY good one. Egg Salad and Tuna Salad are similar in the sense that they can be ruined very easily. So often they are weighed down with mayonnaise and whipped too smooth. A good egg salad should be nice and chunky and have enough mayo to hold it together, but mayo shouldn't be the predominate flavor.

The most important thing is making sure you dont OVER boil the egg. You have to boil the egg enough that the center sets, but you still want it creamy. Timing the cooking of the eggs is very important. Also you MUST toast your bread. If you dont, the egg salad makes the bread mushy, and its yuck-o.

There are many ingredients you can add to egg salad, I like chives and capers. Other options are celery, onion, dill, and mustard. When I have an egg salad thats particularly tasty I always try to get the recipe. Knowing the slight variations is great so you can mix it up for yourself and those you feed.


Splish, Splash, Eggs takin a ice bath:

Note: I read that the fresher the egg the harder it is to get the shell off. I happen to have some eggs from the store(white) and some from a local farm(brown). I did find the fresher local eggs where much harder to peel than the store bought kind. All that goes to say is older eggs are great for this dish!


Egg Salad Sandwich


The Goods: Makes 2 cups, or four sandwiches
6 Large Eggs
1/4 Mayo, add more or less depending on your preference
1/2 bunch of chives, chopped (about 1/4 cup)
1 teaspoon freshly squeezed lemon juice
1-2 tablespoons capers (optional)
Salt and pepper to taste
Whole Wheat Bread, toasted
Baby Spinach(optional)

The Deal:
1. Place the eggs in a pot and cover with cold water by a 1/2-inch or so. Bring to a gentle boil. Now remove from heat, cover, and let sit for exactly seven minutes. Have a big bowl of ice water ready and when the eggs are done cooking, gently place them in the ice bath for three minutes or so - long enough to stop the cooking.

2. Crack and peel each egg, and place in a medium mixing bowl. Add the mayonnaise, and a couple generous pinches of salt and pepper. Mash the eggs with a fork. Be careful here, you want the egg mixture to have some texture, think chunky. If you want to add a bit more mayo to moisten up the mixture a bit, add it slowly.

3. Add chives, capers, lemon juice, and more salt and pepper to taste. Stir just enough to mix. 

4. Place egg salad on toast with spinach(or lettuce) and enjoy!

This recipe is based on a few recipes, but predominately from the egg salad from 101 cookbooks website. Im becoming more and more obsessed with this website by the day.