Showing posts with label Caramelized Onions. Show all posts

Sunday, January 8, 2012

Sofrito. So-do-it-o.


How can there be so much delicious food in the world? I don't understand, shouldn't there be a limit? There are just so many ways to combine tomatoes and onions. You add one spice, cook one thing differently and WHAM, entirely new flavor combinations to amuse your pallete. I know it's obvious, but I am so amazed at how many different ways there are to use the same ingredients. I want to know them ALL. But of course that takes time, blah blah. This recipe comes from Jose Andres, or Mr. Tapas, as I refer to him. He is a super famous chef who has restaurants, cookbooks, and nice belly, you know the usuals for a good chef. Sofrito is a classic spanish tomato sauce that has a ton of variations. The ingredients are simple, so there are plenty of ways to try your own spin on this classic sauce. Do not use traditional paprika here, the spanish smoked paprika is essential in creating the smoky flavor.
The onions part 1: Cooking
The onions part 2: Caramelized and ready for maters!
Sofrito
Based on Jose Andres recipe
Just remove bay leaves and serve! Or store for later.
The Goods: Makes about 2 cups
1 (28 oz) can whole plum tomatoes
1/2 cup extra virgin olive oil
1 tablespoon butter
4 small onions, finely chopped
1 teaspoon sugar
1 teaspoon salt, more to taste
1 teaspoon spanish smoked paprika
2 to 3 bay leaves

The Deal: 
1. Heat oil and butter on medium heat in a large saute pan. Add onions, sugar, and salt and stir to evenly mix ingredients. Heat onions until browned and caramelized, about 40-45 minutes. Stir occasionally and reduce the heat if the onions begin to burn.

2. While the onions are cooking drain the plum tomatoes. Place whole tomoatoes in a food processor and blend until chunky, about 10 pulses. This is a very up to you step, puree more if you want a smoother sauce, blend less if you like a chuncky sauce.

3. When your onions are caramelized add tomato puree, paprika and bay leaves. Stir and heat about another 20 minutes. Add additonal salt if needed. Remove bay leaves before serving or storing.

Wednesday, November 2, 2011

Baked Sweet Potatoes with Ricotta Bruschetta and Caramelized Onions

Little bites of fall heaven
Creating recipes is tough, yall. This dish was inspired by a need to use up some food in my kitchen. It was a very make it up as I go type dinner that happened to work out well. Score, there is usually about a 50/50 shot of that. I knew I needed to use a half empty container of ricotta and already had flagged a recipe for ricotta bruschetta in one of Barefoot Contessa's cookbooks. The recipe called for the cheese mixture to be served on toasted bread, but I wanted to healthy that up a bit. That began the elaborate process of looking around my kitchen to see what else I could use. My eyes surveyed the bowl of local vegetables on the counter and honed in on some boring looking sweet potatoes. Of course we all know how far from boring sweet potatoes taste, but they are not lookers. Yellow onions hid underneath the sweet potatoes, just hoping to get thrown in the mix. My college roommate and I used to make these baked sweet potatoes that were so (oooooooo) good, and since I had local sweet potatoes I figured might as well combine two awesome recipes to see what would happen.

Success! Baked Sweet Potatoes topped with an herby ricotta mixture finished with sweet caramelized onions were in fact little bites of savory goodness. Baking the sweet potatoes gave them a lovely soft texture while the breadcrumbs added a needed crunch. The ricotta bruschetta was light and full of all the right herbs, while caramelized onions finished it off with a hit of sweetness. I'm sure I could improve on this recipe, and will certainly try, but for now it's pretty freaking good. It is a good main course, served with a side of green vegetables, but would also make a great appetizer. As an appetizer I would try to get small thin sweet potatoes as to make them bite sized. I used large sweet potatoes, which required a plate and a fork if you consider yourself fancy.
Sliced avocado was what I wanted to top these with first, but they were all rock hard and expensive at the grocery store. The onions were delicious, but I bet you could top this with fresh tomatoes, avocado, perhaps evenly lightly sautéed mushrooms. All the vegetables used in this (except the herbs) are seasonal, and the greens, browns, and orange are perfect fall colors to decorate your dinner plate.


Ricotta Bruschetta with Baked Sweet Potatoes
Adapted from my brain, with help from the Barefoot Contessa.


The Goods: Serves 4-6 as main course
2-3 large sweet potatoes, sliced 1/4 inch
2 cups breadcrumbs ( I prefer panko, just read the ingredients before you buy them)
4 tablespoons (more or less) of butter, melted plus 2 tablespoons for the onions
2 cups ricotta
3 tablespoons scallions white and green parts, minced
2 tablespoons fresh dill, minced
1 tablespoon fresh chives, minced
1 large yellow onion, halved and sliced in 1/8 inch slices
Kosher salt and freshly ground pepper to taste

The Deal:
1. Preheat oven to 375 degrees and grease 2 large cookie sheets. First caramelize your onions: In a large saute pan on medium high heat melt 2 tablespoons of butter. Add onions and saute until lightly browned, about 10 minutes. Stir frequently. Reduce heat to medium (or medium low depending on your burner) and cook onions until soft and browned, about 40 minutes. Only stir occasionally, but watch for burning. If they begin to burn reduce heat.

2. Set up your breading station. Place melted butter in a shallow bowl. Then place breadcrumbs and a good dash of salt and pepper in second bowl. Coat sweet potato in butter, letting excess butter drip off, then dredge in the breadcrumbs being sure it is evenly coated. Place on the greased cookie sheet. Repeat with remaining sweet potatoes. Bake until lightly browned and soft, about 20-25 minutes.

3. While sweet potatoes are cooking, make your ricotta bruschetta. Combine the ricotta, scallions, dill, chives, 1 teaspoon salt and 1/2 teaspoon pepper in a bowl.

4. Once your sweet potatoes and caramelized onions are ready, assemble your dish. Place 1 breaded sweet potato on the plate, followed by a heaping tablespoon of ricotta mixture, and finish with a a good dash of onions. Serve immediately.

Wednesday, October 12, 2011

I like to quiche and tell

Quiches and Hugs. I must be stopped. 
"Baby, put the books up, it's time for sleeping," Healthy boyfriend yawns as he begins to close the mini fortress of cookbooks I have stacked around me in bed.
"I gotta figure out something to do with this eggplant and chard. Five more minutes, promise."
 After another 20 minutes he forces me to put the books away and lay down. Our bodies mold to each other and I attempt to shut my brain down, beginning my calming yoga breathes.
 "Quiche! Why don't you make me a quiche!" He whisper shouts, poking me in the sides with his excited fingers.
"Those are kinda time consuming babe, I would have to-"
"Yes! Great! A quiche it is. Thanks baby." He smiles and hugs me close, knowing I'll be dreaming of quiche all night.

And how did this quiche turn out you wonder? Really fucking good is how. Possibly one of the best things I've made so far for my blog. I have made a few quiches in my day, but never one this tasty. There are a few tips that, if followed correctly, ensure a creamy center and crispy flakey crust every time. The ingredients I used were all local vegetables I needed to cook before they spoiled, and I think they worked beautifully together. Even though plain saute chard really bothered my taste buds, I loved it in the quiche. Cream and goat cheese helps plenty of things go down easier. I used fairy tale eggplant, because that's what I had, but traditional or japanese would work as well.
Don't they look right out of a fairy tale? They have hats! 
Does making your own crust take a while? Yes. Does everyone have that kind of time? No. Does a light, flakey homemade crust set your quiche apart and encourage you and your dining companions to high five each other in a victory that can only be described as a Quiche-ictory? Hell yes! Make your own crust, your life will be better for it.

If you are making your own crust, then you have plenty of time to carmelize the onions. I started cooking the onions about 15 minutes after I put the crust in the freezer. That way they were done before I had to cook all the other vegetables. If you buy a pre-baked crust you can always just saute the onions until lightly browned, which takes about 5 minutes. The caramelized onions were succulent, sweet and added a real pop to the quiche, so I highly encourage the additional effort. Earthy garlicky chard, sweet onions, salty eggplant, finished with creamy goat cheese. What more could a quiche ask for?

I debated whether you really need heavy cream AND whole milk. That is what I used because I happened to have both on hand. Healthy boyfriend drinks whole milk (still not a ounce of fat on his beautiful body) so he always has some handy. Next time I will try 1/2 and 1/2 and perhaps 2% milk.


All the vegetables and eggs were local. The thyme was from my tiny herb garden. Fall has incredible vegetables to offer, so go explore your local farmer's market. It's likely you can find all these vegetables. You don't have to quiche and tell if you don't want to :)


Quiche with Carmelized Onion, Eggplant, Chard, and Goat Cheese
Adapted from America's Best Test Kitchen
Having your crust be still warm when you pour the quiche batter in is crucial to having a firm bottom crust.
The Goods: Makes one 9 inch quiche
1 9 inch pie crust partially baked and still warm
2 medium yellow onions, halved then cut into 1/4 inch slices
1 1/2 cups swiss chard, roughly chopped
2 cloves garlic, minced
1 cup eggplant, peeled and diced in 3/4 inch cubes
1/4 cup goat cheese, crumbled
2 tablespoons olive oil
5 large eggs
1 cup whole milk
1/2 cup heavy cream
1 teaspoon fresh thyme, minced
1/2 teaspoon pepper
1/4 teaspoon salt, plus extra for sprinkling
Dash nutmeg

The Deal:
1. Start by Caramelizing your onions (click on the link to get step by step instructions). If you are pre-baking your crust, you can carmelize while your crust pre-bakes. The onions should be ready before the pie crust finishes pre-baking. Once you get your onions started, mix a teaspoon of salt into a bowl with your eggplant and let it dry out for 20-30 minutes.

2. Remove crust from the oven, and decrease oven heat to 350 (oven would be at 375 if blind baking crust). Heat 1 tablespoon of oil in a saute pan on medium high heat. When hot but not smoking, add eggplant, tossing frequently to cook until lightly browned, around 4-8 minutes.
Cooking eggplant and chard at the same time
3. At the same time in another saute pan, heat remaining olive oil on medium heat. Add garlic and cook until fragrant, about one minute. Add chard and saute, stirring occasionally until wilted, 3-5 minutes. Your onions should be caramelized at this point, just be sure to remove from heat.

4. While your vegetables are cooking in a large bowl whisk eggs, milk, cream, thyme, nutmeg, salt and pepper in a large bowl.

5. Once all your vegetables are ready, sprinkle eggplant, chard, onions and goat cheese on the crust. Open the oven and place your pie plate on the oven rack. Then gently pour the egg mixture into the shell until it reaches about 1/2 inch from the top of the crust (Depending on the depth of your pie shell you may have leftover quiche batter). Bake until the top of the quiche is lightly browned and a knife inserted comes out clean, about 40-50 minutes.
Add vegetables to crust first
Pour egg mixture on once pie is on the oven rack
Leave room at top for quiche to expand, then bake! 
6. Transfer the quiche to a baking rack to cool for about 10 minutes. Serve warm or at room temperature.
Insert fork and prepare for happiness. 

Friday, September 30, 2011

French Green Beans with Herbs

Its so easy being a french green bean!
Oh boy it's haircot verts! Skinny mini grean beans that are so cute, I want to make clothes and hats for them. Unlikely I ever will because who has that kind of time? Guess I'll have to dress them up with butter and herbs, that's about as fancy as I get.

Haricot verts, aka french green beans, are in season right now along with their thicker counter part, good ole regular green beans. Green beans hold a special place in my vegetable heart, being they are one of the few vegetables I've always loved. Of course I used to only eat green beans when they were smothered in cream of mushroom and had crispy "onions" on top, but now I even eat green beans without the casserole. Not that there is anything wrong with green bean casserole, still being one of my favorites at Thanksgiving. Though now I'm just as happy eating green beans steamed, no cream needed.

I looked at a few different recipes for cooking haricot verts with herbs and they all looked as if they used roughly the same method. Par boil, place in ice bath, cook onions in butter, add the beans and finish with herbs. As far as the herbs go, if you have an herb garden use all the herbs I added. Each herb adds a nice flavor, but don't feel required to use every herb listed below, especially if you fear any unused herb is likely to be trash bound.

For me learning to cook is about being conscious of my food choices. So buying 5 different fresh herbs, using a tablespoon of each and then trashing the rest, is not what I call conscious eating. If you have a plan for the rest of the herbs, rock on, go get a satchel of each; but before you go to the store, think about each item you are buying and what you will be using it for. The waste in this country is frustrating, mostly because people don't think to care. Of course it's annoying to plan all your meals. Food is precious, but the wasteful path we as a society our on is not sustainable. So why not start thinking ahead? Everyone has their own unique excuse of why they "just don't have the time". Food, in one way or another, is essential to most living things survival. Food is literally life, why not treat it with the respect it deserves?
Well that turned it to a bit of tangent, but I hope you think about the ideas behind it. Sometimes I feel discouraged about the future and about the lack of foresight I see in humanity. One meal at a time I suppose.

Getting back to green beans, feel free to use the herbs you have. I used parsley and chives, because those were the only two healthy boyfriend could find at the market. Listed below are all the recommended herbs, but my previous paragraph said enough about using herbs the smart way. This is simple way to serve green beans if you are having guests and want something that looks fancy, but is easy and quick. Cooking the onions first gives them time to caramelize, which obviously adds a light sweetness to the dish. In general I don't go to this much trouble for beans, being happy to eat them steamed, but now I have a go-to side for future dinner guests. Now I just need more guests.....

This recipe is adapted from a few different sources and can be used with traditional green beans. But remember if you get french green beans you can practice saying "Haricot Verts" in the most ridiculous french accent you can think of. Worth it.

French Green Beans with Herbs

The Goods: Serves 4 as side dish
1 pound thin green beans (haricot verts) trimmed
1/2 cup red onion, diced
3 tbsp butter or earth balance
2 tbsp fresh thyme leaves
2 tbsp fresh parsley, chopped fine
2 tbsp fresh chives, chopped fine
2 tbsp fresh basil, chopped fine
Salt and pepper to taste
Lemon Wedges (optional)

The Deal: 


1. First we blanch (a fancy way to say boil, chill and slowly reheat vegetables): Bring large pot of salty water to a boil. Fill a large bowl of ice with water. Boil the beans for 2-3 minutes until tender but still crispy. Quickly remove beans with slotted spoon and plunge into ice bath to stop cooking and retain the color. Pat dry with cloth or paper towl.

2. In a large saute pan heat butter on medium high heat. Cook onions until translucent about 3-5 minutes. If you desire the onions caramelized cook an additional 2 minutes until lightly browned. Add the green beans, tossing to evenly coat with butter. Cook until tender about 4-6 minutes.

3. Add herbs, salt and pepper, and toss to combine. Cook for an additional minute.

Serve hot with lemon wedges on the side if desired. Eat with your fingers if extra sillyness is needed.

Friday, September 9, 2011

Vegetarian Sandwich with Portabello Mushroom, Squash and Avocado

So delicious and good for you! 
Wouldn't you know some of the best ideas come when I get my crazy ass OUT of the kitchen. A few nights ago I asked healthy boyfriend to make dinner, because as much as I love to cook for him, sometimes I just want to sit down, read some YA fiction and drink a beer after work.

This particular evening I went running, which I'm very half-assedily trying to get back into, and I knew after my first run in months I would have cranky sore britches when I was done. So healthy boyfriend offered to prepare dinner, and I happily agreed.

Often when he makes dinner it's very simple and vegetable heavy. Which can be refreshing, but I do complain about the blandness of flavor. Of course when all I want is food, I try to keep my mouth shut about the particulars because someone making me food is always appreciated.
This time healthy boyfriend knocked my apron right off! Not literally, that was later. Me. Ooow.  Fa reals though; The ingredients and preparation was easy. The taste: SO. FREAKIN. YUMMY!

Sandwiches are one of my big weakness when trying to eat vegetarian. When I see club sandwich on a menu, my mouth begins to water. Turkey, ham, salami, OH the meats that make me forget the environment, animal cruelty, all my morals just for a delicious smoked turkey and havarti with a homemade aioli. Hopefully I can use this creation and others to curb the insatiable appetite I have for meat sandwiches. Huh huh....meat sandwiches.....dirty.... AND focus.

I tried not to add much additional flavor/spices to the vegetables, wanting to let their innate flavor shine. A little garlic for the zucchini and just a splash of balsamic to the mushrooms. I don't like when balsamic vinaigrette overpowers the flavor of a vegetable which is why I did not marinate the mushrooms, just splashed a little on to add a brightness to the already delicious taste of portobello mushrooms.

In the pictures, I cut the squash all wrong. Mind farts happen in the kitchen, so I just cooked them anyway. Cut the squash in thin strips because they lay better on the sandwich that way. Also be creative with your vegetables, these are suggestions, but use what you have. I do think the combo is dyNAmite, so if you can try this way first before tinkering with other ingredients. Obviously this doesn't really keep, so serve immediately.

Vegetarian Sandwich with Portobello Mushroom, Squash and Avocado

The Goods: Makes 2 sandwiches
2 tablespoons olive oil
1 tablespoon butter or Earth balance
1 teaspoon balsamic vinegar
2-3 small garlic cloves, minced
1 ripe haas avocado, peeled, pitted and thinly sliced
1 medium onion, diced
1 small zucchini, thinly sliced lengthwise
1 small yellow squash, thinly sliced lengthwise
1 portobello mushroom, cut into half inch slices
1/2 cup feta cheese, crumbled
Mayonnaise or Vegennaise
4 slices whole wheat bread
1 tablespoon sesame seeds (optional)

The Deal: 
1. Caramelize ya onions. Place butter in a medium saute pan on medium high heat. Once butter is melted, add onions and stir to evenly coat. Saute stirring frequently until the onions begin to lightly brown 8-10 minutes. Reduce heat to medium low and saute, stirring occasionally, reducing heat if they begin to burn.

2. Once your onions are close to being done, begin cooking the rest of the ingredients. On medium heat place 1 tablespoon of olive oil and garlic in a medium saute pan. Cook until garlic starts to smell delicious, about one minute, then add your squash, green and yellow. Saute on each side, stirring frequently, until browed about 6-8 minutes.
wrong cut, right colors :)
3. At the same time heat the remaining olive oil on medium heat in a small saute pan and add the mushrooms. Coat in oil then add a splash of balsamic vinaigrette and stir to coat. Saute, stirring frequently until a fork is easily inserted, about 6-8 minutes.


4. While your vegetables are cooking, toast your bread and spread mayo on the hot bread. If using sesame seeds sprinkle on squash a minute before you remove from heat.

5. Once all your vegetables are cooked, assemble your sandwich in this order: squash, avocados, portabello mushrooms, caramelized onions, and feta. Top it off with the second slice of bread and enjoy a healthy vegetarian sandwich that even meat eaters would love.

Sunday, August 21, 2011

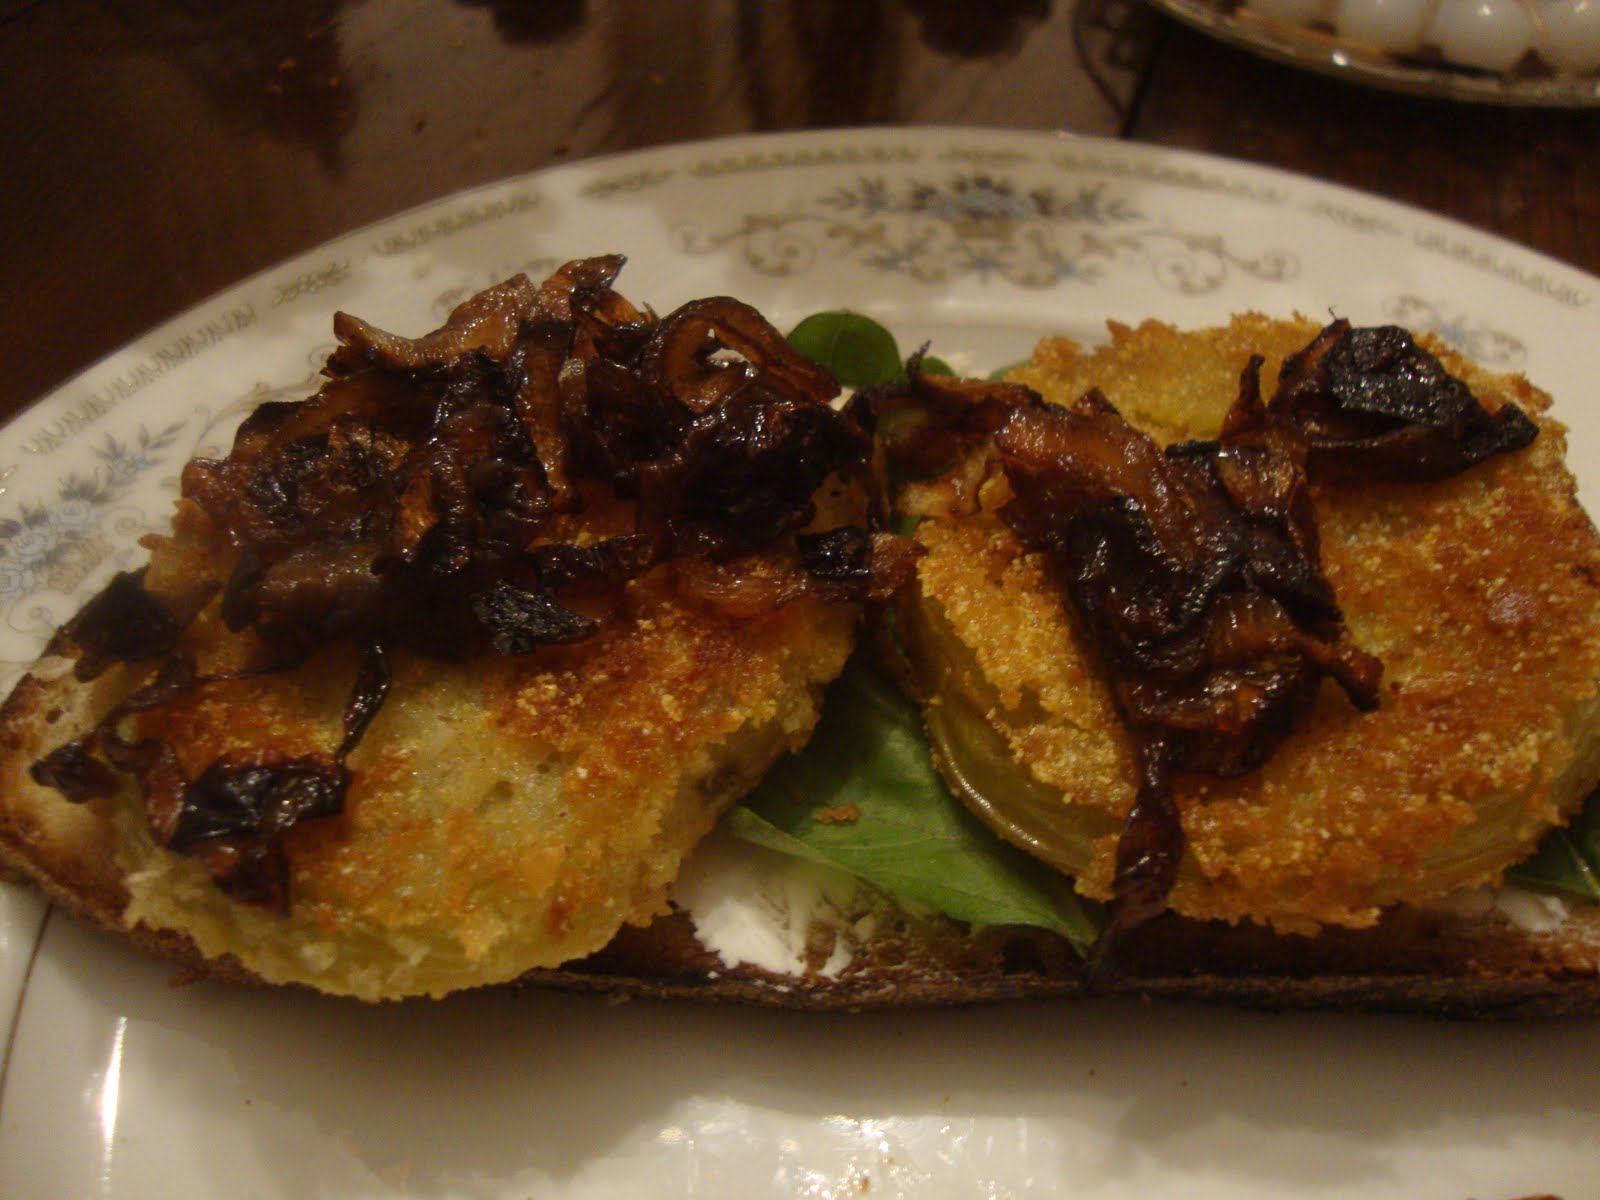
Fried Green Maters with Basil, Goat Cheese, and Caramelized Onions

It is, in fact, easy being a green tomato
Seasonal food is currently my greatest inspiration in the kitchen. Often I feel horribly overwhelmed when  trying to teach myself to cook. With each day I feel more confidant in the kitchen and at the same time completely clueless given the oceans of knowledge that exist about the culinary arts. One day at a time feels too slow sometimes DAMMIT!
Farmers market provide me such joy, that I know buying what is in season must be my guide for now. Time and effort are the only two things that can really improve my skill and knowledge base in the kitchen, so why not cook with the freshest ingredients available. Triple bonus that fresh food also means local and good for the environment. There is no reason to bite off more than I can chew, pun intented, by getting myself worked up over all the things I have yet to learn.

Tomatoes are spilling over tables at the farmer's market right now. Given I don't like eating them, I am forcing myself to find recipes that include the lovely fruit/vegetable. More importantly I'm a southern girl and think its required by law to know how to make a good fried green tomato.

No, its even better than it looks. Even BETTER. 
I will try these again, tinkering with the coating a bit, but I really liked the mix of cornmeal and panko breadcrumbs. I was afraid only breadcrumbs would be to bready, but only cornmeal wouldn't give me the hearty crunch I was after. Combining the two was perfect, though I'll always look for a new way of breading.

The goat cheese idea came from a fantastic sandwich at one of my favorite local restaurants, Sunny Point. They serve a goat cheese, fried green tomato and bacon sandwich that is deadly. Basil is also common when serving green maters as an appetizer, so I took bits and pieces of dishes I like and combined them. The onions just happened to be occupying space in the kitchen so I decided to caramelize them. What a wonderful random accident that turned out to be.

Caramelizing onions is easy, just a bit time consuming. If you have never done it, check out this website that goes into a lot of details and has some nice tips: Caramelizing Onions Again, its not hard, but can be easy to mess up. Once you've done it a few times, it's easy to become a go to for a simple way to jazz up any dish. Bummer cooking onions down that much strips them of almost all their nutritional value. But sometimes flavor wins out, and caramelized onions will make grown men weep with joy. And not just because they were chopping them.


You can always just fry green tomatoes and serve with an aioli or on a bed of cheese grits. Caramelizing the onions took the most time, breading and frying the tomatoes, probably only about 15 minutes. Make sure you use firm green tomatoes, so they don't fall apart when fried.


Fried Green Maters with Basil, Goat Cheese, and Caramelized Onions


The Goods: Serves 2-3 as main dish
Fried Green Tomatoes: 
3 medium, firm green tomatoes
1 cup all purpose flour
1/2 cup panko crumbs (or other fine bread crumbs)
1/2 cup cornmeal
1 egg
1/2 cup milk

Onions and Sandwich:
2 large onions, cut in half and sliced 1/4 inch
1 tablespoonish brown sugar
2-3 tablespoons olive oil

6 ounces goat cheese, softened
6 slices of whole wheat bakery bread, sliced 1/2 inch thick
1/2 cup fresh basil
1/4 cup grapeseed oil(or other flavorless oil), for frying
Salt and Pepper

The Deal: 
1. Heat olive oil on medium high heat in a medium non-stick skillet until oil is shimmering. Add onions and stir to coat. Spread onions evenly and saute, stirring occasionally for about 10 minutes, or until they are browning. Watch carefully to prevent them from burning. Add brown sugar, a pinch of salt, and reduce heat to medium low. They will take 30-40 minutes to caramelize, stir occasionally and reduce heat if they begin to burn.

2. While your onions are cooking, prep your tomatoes. Slice each tomato into 1/2 inch slices. Sprinkle with salt and place on a plate with a paper towel (or dish towel) and cover with another paper towel. Let sit for at least 10 minutes or up to 30.

3. Next set up your breading station. Place the flour and about a teaspoon of salt and pepper in shallow bowl and mix. Next beat the egg and milk in another bowl. Lastly combine the cornmeal and breadcrumbs in bowl.
Time to bread! 

4. Once your onions are done, remove from heat. Dip each tomato slice in the flour mixture, then egg mixture, followed by the breadcrumb mixture. Make sure you evenly coat the tomato in each mixture.
Place on a plate.

5. At medium heat warm grapeseed oil in a large saute pan. Wait until the oil is close to smoking, then add 3-4 tomatoes, being sure not to crowd the pan. Fry for 3-5 minutes on each side, or until browned. Set fried tomatoes on a plate with a paper towel and repeat with remaining tomatoes.

5. Toast the bread in the broiler for 2-3 minutes, until warmed. Assemble your sandwich: Place a good amount of goat cheese in even layer on each slice of bread. Then place 4-5 basil leaves on the goat cheese, followed by 2 tomatoes. Finish with around a tablespoon of onions. Adjust portions to what kind of bread you have, etc.
Serve immediately!